Adesso Server - The Secret Sauce
The SyncAdmin Web Portal

The left pane is the main navigation of the site. the screenshot above was taken of our ASP version of Adesso Server. This is the server version that we use to host multiple accounts. If you are hosting your own server, your version of Adesso would be the Enterprise Edition, and would look slightly different than the one illustrated above. We will talk about the Enterprise Edition version later in this blog.
The most important section of the portal is the Managed Accounts section. When you click on it, you will see the following screen displayed.

In the left pane you are presented with a list of accounts. In the main pane, those same accounts are displayed with some basic statistics.
If you click on one of the accounts in the left pane, the screen will refresh, with a list of databases that are associated with that particular account, and some details of that account in the main pane.

Adding Users To An Account

To add a user, simply click on the Add User link below the menus. To change a particular user's rights, click on the box to the left of the username, then click on the boxes to the right, and click on the Update Permissions button. It's that simple.
Now, please note that there are two levels of users...first you have to add a user to an ACCOUNT. Then that user will be available to be added to an application, but you have to actually add that user to the database application in order for that user to see the app. By default, users added to an account don't have access to any applications in the account until they are actually assigned to that application. This is done in the next step I will show you.
Adding Users To An Application
To add a user to an application, expand the account name on the left pane (if its not expanded yet). Then click on an application in that list. In the example below, I have clicked on one of our legacy applications, EnvironPro2009. This app is used by our field technicians, geologist, and project managers to collect and manage low-flow groundwater data by our field technicians. This application is also used by other environmental firms for the same purpose.

Notice that the main pane refreshes and you are presented with a new series of menus on the top. From the first tab, the Info tab, you can assign someone who has admin rights to the account as the admin for the application. You can also flag the application to become a template to create other applications, and you can even propagate changes and data from this "parent app" to all the instances you create. More about this awesome feature will be covered in a separate blog post. Very powerful feature that requires its own blog post.
To add a user to the app, click on the users tab. Your screen will look like the following:

If a user has access to the account (as I showed you previously), he will appear on the left window. To add him tot he application, highlight his name and click on the Add button. It's that simple. Once you add a person to an app, you can then control that person's permissions and sync rules from this same area. To do this, simply click on the Permissions tab (its a submenu below the top menus on the main pane).
User Permissions

Notice that in the main pane, you are presented with several columns:
- Table - the table name in the database
- Read - displays list of fields that, if highlighted, the user can read/view
- Modify - displays list of fields that, if highlighted, the user can modify values in records created by others
- Add - if checked, allows the user to add records to that table
- Delete - if checked, allows the user to delete records from that table
- Export - if checked, allows the user to export records from that table via the Record>Export menu in Adesso Client
- Modify Owned Records - if checked, allows the user to edit his own records after they are created and saved to the local device database
- View - displays list of views that, if highlighted, the user will see on his copy of Adesso Client
In essence, from this screen, you can control EXACTLY what you want your user to see and do, down to the table and field level. you can control- or shift-click to select several fields from the Read, Modify, and View columns. In the Read and Modify columns, there are also "All Fields" and "No Fields" options. When you first add a user to an application, by default it allows a new user to read all the fields in all the tables, and locks out a user from being able to modify values in records created by others. That's what the Modify column is all about...for example, if User X creates a record for Table 1 and syncs, you can control whether or not User Y can edit a specific field in that table created by User X. To give him rights to edit a specific field, simply highlight that field on that table for that user.
If you want a particular table to be hidden from a user, just click on "No Views" in the Views column for that particular user.
Application Designer (Modify Schema) Permissions
Notice that on the Permissions screen, there's a checkbox for Application Designer permission. If that box is checked for a particular user, then that user will be able to open the Application Designer in Adesso Client and will be able to modify the application schema...tables, fields, views, forms, etc. If the checkbox is unchecked, the Application Designer menu will be grayed out/inactive on his copy of Adesso Client.
Sync Settings
The second part of controlling what a user can do and what he can see in a particular application is handled via sync settings. When you click on the Sync Settings link, your screen will look like this:

From this screen you can click on a particular user, then a particular table, select a particular type of sync, and even the type of conflict resolution. Depending on the sync type, you can even add sync rules/queries that will control which records are pushed up to the server from the client or vice versa, down to the client from the server. All of this can be done at the table level, meaning you can change any of these parameters for a particular user for a particular table. In other words, you can have a particular type of sync (client to server) for one table, and have a completely different type of sync type (bi-directional) for a different table for the same user. Very simple to use. The sync types are as follows:
- Bi-directional - data gets sent first from the client to the server, then back down to the client from the server
- Server-to-Client - Sends records from server to client only
- Client-to-Server - Sends records from client to server only. When a user creates records on his device, it stores them locally, and can be viewed in grid view. Once the user syncs, all the records are uploaded to the server and his grid view for that table is cleared out
- No Sync - data on table doesn't get synced at all
Conflict Resolution
There are 4 conflict resolution types available, and a different type can be assigned to different tables.
- Ask User - during sync, if a conflict is detected, a window pops open, the server record and the client record are displayed side by side in this window, with the conflict field highlighted in bright green. The window contains controls to tell the server how to handle the conflict: overwrite the server record with the local record, overwrite the local record with the server record, or keep both records. For each conflict, it will display this windows unless the user clicks a box in the window to treat all conflicts in the same manner
- Client record overwrites server record
- Server record overwrites client record
- Keep both records
Like I said earlier, you can assign a different conflict resolution to different tables for a particular user. By default, when you first add a user to the application, it will assign bi-directional sync settings and "ask user" conflict resolution to each table.
Sync Rules
Sync rules are used to control the data going either up to the server from the client and/or down to the client from the server. Sync rules are typically uses for instances where you want to have bi-directional sync type, but you want to control the records being pushed down to the client for a particular user or user group. When you use Pocket PCs and small Windows Mobile devices, you don't want to clog up the device with thousands or even hundreds of records...if you do, the PPC will either run ridiculously sluggish or won't run at all. Those devices have a limited amount of RAM and aren't meant to handle hundreds of records. That's what the sync rules are for. Another benefit of using a sync rule is that you can use them to push only records to someone that meet a specific criteria, like a project number or company name, for example. This allows you to use a single database and use it for multiple departments, companies, groups, teams, etc, and no one on one team/group/dept/company would see what another group sees...they would only see what is relevant to their own group.
The screenshot below illustrates a bi-directional sync type with a rule inserted in the server-to-client direction:
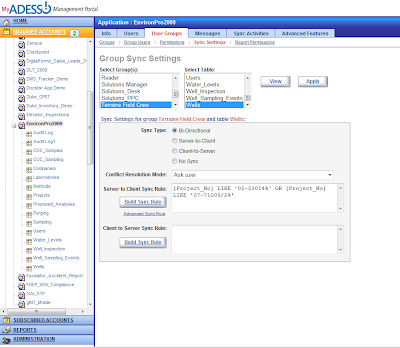


The screenshot below illustrates a bi-directional sync type with a rule inserted in the server-to-client direction:

In the example above, we are passing records FROM server TO client that meet the following criteria:
[Project_No] LIKE '05-53014%' OR [Project_No] LIKE '07-71009/2%'
The syntax above follows certain rules:
- Fieldnames are enclosed in brackets ( [ and ] )
- LIKE is the same as "contains"
- text to search for needs to be enclosed in single quotes ( ' )
- the wildcard symbol is the percent sign ( % )
- the wildcard symbol can be placed at the beginning of the text or at the end
Build Sync Rule Helper
You will also notice that there is a button called "Build Sync Rule". If you click on it, a new window will appear that looks like the following:

On the left pane of this new window, all the fields available for this rule will appear. On the right pane, different functions appear. Several controls like AND, OR, NOT, =, <, >, etc appear. Toward the bottom some instructions are displayed. Once you have built your rule, simply click on the "Done" button to push it out to the sync rule direction box.
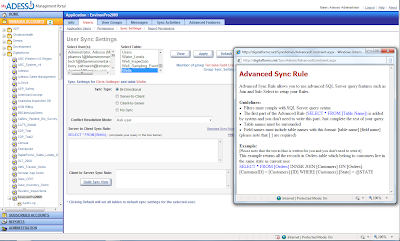
Advanced Sync Rule Link
If you feel up to it, there's also an advanced sync rule link, that, when clicked, displays a slightly different sync rule box with a help screen to guide you on how to build a proper sync rule. Your screen should look like the following if you click on this advanced sync rule link:

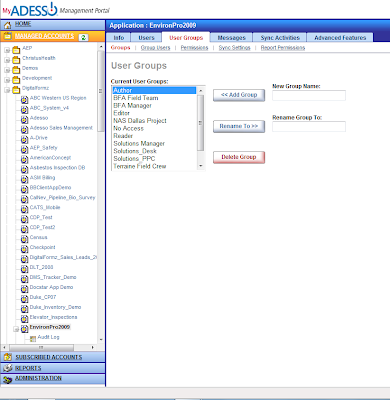
User Groups
If you don't want to mess with assigning permissions and sync rules to every single user individually, you can do this using user groups. Let's say that you have 100 users, and 75 of them are field folks that are only going to enter records, 20 other people manage the data in-house, and 5 others need to access the database schema to make edits to it. Rather than going through each of the 100 users manually, which can take forever), you can set up 3 groups to handle this. What you would do is create a Field Team group, a Data Manager group, and a Database Designer group. To set these groups up, click on the User Groups tab on the top of the main pane.

From this screen, you can create, rename, and delete groups. This is pretty much self-explanatory. Nest you will want to push users to specific groups. To do this, click on the "Group Users" link.

Simply click on the group from the top scroll window, click on view, then find the users you want to add to the group, and click on the Add button.
A FEW NOTES ABOUT GROUPS:
- The groups feature does not currently support cascading groups. What I mean by this is that you can't add a group into another group, and so on.
- When you add a user to a group, that user then is assigned the permissions of that group. However, if you then change that particular user's permissions individually through the users tab, then those changes override the group permissions.
- If you want to refresh a particular user's permissions because you edited that user's permissions manually from the users tab, remove that user from the group and add him back in.
The rest of permissions and sync rules for Groups is the same exact process as what I described in Users. So there's no need to explain this.
Send Messages to Users
The SyncAdmin portal also has a feature to allow you to send messages to the users. Pretty simple feature. Screenshot is displayed below:

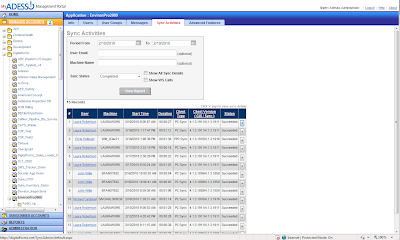
Sync Activities
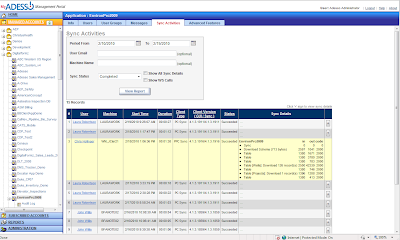
This particular feature allows you to view every single sync activity that has been conducted on the server for a particular application. When you first click on the Sync Activities tab, your screen will refresh and look like the screenshot below:

From here, you can enter a date range, an optional user credential, an (optional) machine name to search for, and a sync status type (succeeded, currently syncing, aborted, and failed). There are also two other checkboxes to the right:
- Show All Sync Details - lists every single sync item. By default, this is not checked.
- Show WS Calls - lists web services calls. By default this is not checked.
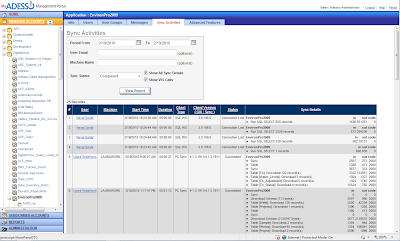
If you provide a date range, but and leave the checkboxes unchecked, if there was activity on the server, it would look like the following:

If you click on an expand button for one of the rows, you will see all the details for that one sync session, similar to the screenshot below:

If, before you click on the View Report button, you had checked both checkboxes, your screen would look something like this:

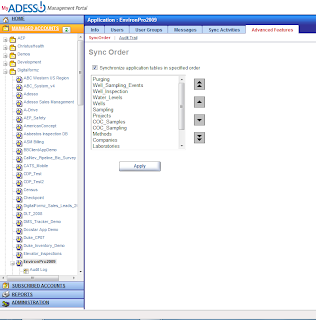
Advanced Features
If you click on the Advanced Features tab, you will be presented with the ability to change the sync order of the tables, and also be able to add an audit trail to your application.
Sync Order
If for some reason, you want to have a specific order of syncing tables, you can do this from this screen.

Audit Trails
If you want to add an audit trail, click on the Audit Trail link. Your screen will refresh and look like the following:

From here, you can create an audit trail for any type of event. Events are defined as the following:
- Add Record
- Modify Record
- Delete Record
- Modify Field(s)
A note on audit trails: if you create an audit trail, please be aware that your database can grow rapidly. This is because a new record will be created in a new table called "Audit" for each event you are auditing. If you decide you want to know when a new record is added, deleted, and modified, up to 3 audit trail records will be created for each record in a particular table. We can discuss this is more detail at a later time. Suffice it to say that you need to be careful when creating audit trails. And you probably only want to record if a record has been edited. you can control delete capability from user permissions, so if deleting records is an issue for your application, simply eliminate this permission type for all users of the app. Simple as that.
We haven't even discussed reporting, subscribed accounts, and server admin. We will discuss those things in a later blog post. Hopefully, if you have actually read this post, you should see how relatively easy it is to manage user permissions and sync rules, and monitor activities occurring on your server. It's really simple. Really. That's the power of the secret sauce. Simplicity that normal humans like me can understand. At least I think I'm a regular normal average Joe...
No comments:
Post a Comment