I want our software to run on the iPad. Fortunately, we own the source code for Adesso, and we have a few crack programmers who could probably make it happen. All in time. Maybe by the end of this year, maybe. Ok, enough said about that.
On my last post, I talked about how to design buttons in Adesso. Today we are going to look at a few of the more complex types of buttons, with the principal point of showing you real-life buttons, what they look like in runtime, and what they do.
Run Plugin Action
A few notes about plugins:
- in order to run a Crystal Report plugin, you will need to have installed the Crystal Report runtime engine (its free and provided by SAP) on your PC. If you need it, email me and I can get it for you
- in order to run a plugin that generates an Excel or Word document, you will need to have MS Office installed on your PC
- in order to run a plugin that generates and displays a PDF document, you will need to have installed Adobe Acrobat (Reader, Standard Edition, or Professional)
- Crystal Report windows lock Adesso until you exit the Crystal Report window, meaning you need to exit out of the Crystal Report window before you can do anything else in Adesso
- External type plugins discussed here do not work on PocketPCs or Windows Mobile devices
- Print TA - generate document and display it in a Crystal Report form
- Generate TA PDF - generate the document and display it in Adobe Acrobat
- Email TA to DENR Mgr - generate the document and send it as a link embedded in an email to the intended recipient

Print TA (Crystal Report Format)
This button is used to create a specific document and display it in a Crystal Report window. When you click on the button, the form that displays will look like the following:

On the upper left corner there are a few icons. The leftmost icon is an export menu, which, when you click on it, displays a dropdown menu that allows you to select a format to export to. Choices include Crystal Report (.rpt), Word (.doc), Excel (.xls), .rtf, and xml.
NOTES:
- in order for this menu to work, you need to have MS Office installed on your PC.
- Crystal Report will lock Adesso until you close the window. This means that you will not be able to go back to Adesso while this window is displayed.
Generate TA PDF (Adobe Acrobat Format)
This button is used to basically display the same thing as a Crystal Report, but instead of using the Crystal Report window, which has export features, but which also locks down Adesso, it instead creates a PDF and pops it open in Adobe Acrobat (Adobe Reader works fine too, which is free). Because it is opened in a separate application (Adobe Acrobat), you can continue working in Adesso independent of the Acrobat window. However, you will not be able to export directly to Excel or Word, for example, since you will be inside the Acrobat application instead of Crystal Report.
When you click on the button, your screen will look like this:

Email TA to DENR Mgr (Generates an Email)
This plugin is a bit more complex. When a user clicks on the button, the plugin will first pop a window open and request the username, it will then create a new record in a child table called TA_Status and will populate the status field with a value of "TA Submitted" and the status_date field with a value of NOW(). A server-side script running every hour (via Windows Task Manager) will then detect the new status record and assign a value of TRUE to the TA_submitted (boolean field) field in the parent table. Once this is done, another script running every 2 hours will detect this value and a Null value in the TA_emailed field for the same record, and it will then fire off an email to the recipient, which in the case of this system, is the email address in the DENR table which is related to the TA table via the DENR_Incident_Manager field. The email contains dynamic subject line and some dynamic text in the body of the email, all coming from values stored in the TA and related Project and DENR table records. A link is provided in the email body that, when clicked, navigates the DENR Manager who clicks on it to a website login page. Upon login, the exact same form that you see above pops open, but this time in an editable web browser window. Almost all items in the browser window are editable, and edits made in this window, once saved, get pushed back to Adesso. A screenshot of the web browser TA edit screen is presented below:

What is Under the Hood to Make This Work?
Let's take a look at how these plugins triggered from buttons actually work. First step is to pop open the Application Designer, go to the Forms Design section, and find the TA form. Screenshot is displayed below:

When I click on the Print TA button, the button designer appears, as illustrated below:

The core of the functionality produced by the button is the Run Plug-in action. Notice that when you select "Run Plug-in"action from the action dropdown, the dropdown menu below will populate with the plugins stored in the plugin designer section of the application Notice that the plugin being called by this button is labeled "PrintTAFormReport". Now we know that we need to look for this plugin in the Plugin designer section of the Application Designer. So the next step is to close the button designer and the form, and click on Plugins from the left pane of the Application Designer. When you do this, you will see all the plugins that have been created for this particular application. One of them is called PrintTAFormReport. Double-click on this plugin to take a look at it.


The main piece here is that this particular plugin is calling a resource called NCSLTAForm.dll and allowing buttons, expressions, and events to trigger the use of that DLL. In a nutshell, you need to design the DLLs outside of Adesso and import them into Adesso. In its current state, Adesso DLLs should be created in Visual Studio 2005, and they need to target/be compiled for .NET 2.0 Framework. We will be updating Adesso to .NET 3.5 sometime this year.
To import your DLL into Adesso, you need to navigate to the Resources section of the Application Designer and click on the New button on the bottom. Your screen should look like the following. Notice that the DLL called NCSLTAForm.dll is in there.

Both of the other 2 plugins (Generate TA PDF and Email TA to DENR Mgr) operate under the same concept:
- Create a form or .NET executable in something else like Visual Studio 2005
- Generate the DLL from your external application and import it into the Resources section of the Application Designer
- Create a plugin from the Plug-ins section of the Application Designer
- Select the appropriate resource for your plugin, and give it rights to be used by buttons, expressions, and/or events as appropriate
- Add a button to your form, select "Run Plugin" action and then find your plugin in the plugins dropdown menu.
Read GPS Action
- Create your GPS fields in your tables first. They must be of float data type and of display type GPS.
- Add your fields to a form
- Add a button on the form and assign it an action of Read GPS
- Make sure that the correct port is assigned in the Preferences menu in Adesso Client runtime mode


Field types that you create to assign latitude, longitude, and altitude should be float type. The field designer is illustrated below:

The dropdown menu in the GPS Control has several options which you can select to read from your GPS device.

Finally, to create a button that can be used to read the GPS device, simply add a button to the form where your GPS fields are, and select "Read GPS" from the action dropdown. Your button designer should look like the following:

New One-To-Many Record
This action type is very popular and powerful. You can use it to create child records from a parent table. When you do this, the fields in the child table that are connected to the parent table through the 02m (one-to-many) relationship automatically pre-populate with those values. This makes it nice because the child record will retain the relationship to the parent record as long as there is uniqueness within the relationship. An example of this type of button is illustrated below:

Typically, this type of button control is used on the same tab as an 02m grid that is used to display the child records that are related to the parent record displayed on the form. In the example above, the 02m grid is displayed above the large button labeled "New Line Item". In the Application Designer, the form looks like this:

The button control is very simple. It is displayed below:

To trigger this type of button action, all you need to do is select "New One-to-Many Record" from the Action dropdown menu, and then select the correct relationship from the Parameter dropdown menu. Of note here is that the relationship that you select must be on the same tab on the form.
New One-To-Many Record Using Tags
A second way to create child records from a parent record using a button control is to select an action type called New One-to-Many Record Using Tags. This action type is useful when you have more than one form for a table. It is basically used to navigate the user to the correct input form for a table that has several forms. In runtime, the button looks exactly the same as any other button. But in the Application Designer, you have to do a few things to get this action right. A screenshot of the an example form is illustrated below:

In this particular form, there is a 02m (one to many) grid above the button. That particular 02m table has several forms associated with it, so in order to open the correct form, we can use tags. If you double-click on the 02m grid, you will see the following 02m designer screen:

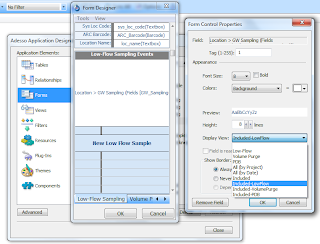


Two important things to notice about this screen: the Tag number (top part of the form control properties window), and the Display View dropdown menu. The Display View menu, when clicked, will show you several views available for the 02m, as illustrated below:

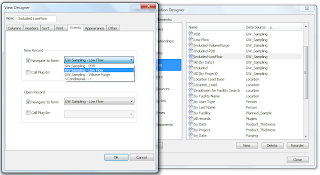
Each view listed in that dropdown has different filters and form events assigned to it. Let's take a look at the view that we have selected: IncludedLowFlow:

Notice that in the Events tab, you can navigate to a specific form for two different action types: creating a new record, and opening an existing record. For this particular view, we have chosen the GW Sampling - LowFlow form, a very specific form with certain fields and tabs on it. Since this view has a specific form assigned to it for both action types, if the user navigates to this view, then if he opens an existing record or creates a new record from that view, it will open that very specific form. So, long story short, if you want to create a button that will navigate the user to that very specific form, you need to use the button action of New One-to-Many Record Using Tags and assign the correct tag number on the 02m grid that navigates the user to the specific form you want to open. Lets go back and take a look at the 02m grid properties. Notice that the tag ID assigned to it is 1. You can give this tag any number between 0 and 255. Default ID is 0. We have chosen to give it an ID of 1. All you really need to do at this point is make sure that the Tag ID in the parameters box below the button action is the same number as the tag ID in the 02m grid properties. Since we assigned it a value of 1, then the parameters box has a value of 1 in it as well. That's how this works. Once you do that, the correct form will appear when the user clicks on that button to create a new child record.
Calculate Expression Action
This is one of the more powerful button features in Adesso. With this feature, you can trigger a calculation, an action, etc with the click of the button. You can also disable the button after clicking on it once, thereby giving you additional control on when the button can be clicked.
To use this action, there are several steps. We will peel back, or reverse engineer, how this functionality operates in Adesso. Let's take a look at an example button that uses this feature:

In this example application, we are going to take a closer look at the BP Presented button. It's the one on the top left of the form window. This particular application was built as a demonstration on how Adesso could be used to track the amount of time it takes an airline passenger to go through security at an airport. In the case of the BP Presented button, we want to be able to click the button when the passenger hands his boarding pass (BP) to the TSA employee. In the background, when the button is clicked, several actions are being performed: a time stamp is stored in a field; the button becomes disabled; and the foreground color of the button changes. In this particular example, we are disabling and changing the color of the button programmatically, but it can also be done through the button GUI.
In runtime, if the user clicks on the BP Presented button, it will become disabled and change colors, as depicted in the screenshot below:

Notice that the button now has a white background. Although the user doesn't see it, a timestamp is also created and stored in a separate field.
Let's take a look at what's going on behind the scenes. A screenshot of the main form and button designer is presented below:

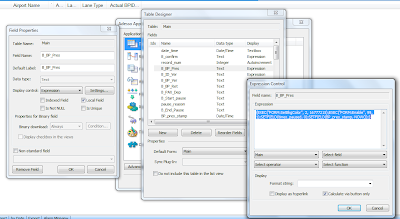
Ok, notice that the button action is "Calculate Expression", and the Field dropdown menu has a field labeled "B_BP_Pres". Basically, when you select "Calculate Expression" from the action menu, you will then be able to select a specific field from the list of all the fields in the table associated with the form. All you need to do is select the field that contains the expression you want to run, and presto! it's done. Ok, not so fast. Let's take a look at that field that we selected, and see what it says:

A fe things to notice. In the Field properties box (on the left in the screenshot), you will notice two key elements: Is Local is checked, and its an expression display type. Is Local is checked because you don't want to sync the values in this field back to the server...there's no need to do that, this is a local action only, and other users using this field will have different values in that field when they use it, so the chances of creating conflicts during sync increases if this checkbox remains unchecked. Remember that local fields don't pass the values in them back to the server...they are treated as null values.
When you click on the settings button (next to expression display type), the expression editor appears. A key element here is that "calculate via button only" is checked. What this flag does is disables the expression from running EXCEPT when it is triggered by a button. You don't want to trigger this expression every time the user opens the form...only when the user clicks on the button.
Finally, the expression itself
{EXEC("FORM:SetBkgColor", 2, 16777215);EXEC("FORM:Enable", 99, 1);SETFIELD(times_paused, 0);SETFIELD(BP_pres_stamp, NOW());}
Is a series of functions separated by the semi-colon, and all within curly quote {} brackets. If you want your expression to do several actions, that's the syntax that you need to use. Notice that we are assigning background colors, then disabling the button all programmatically. This can now be done by using the button designer GUI. The last 2 functions in the expression above are assigning values to other fields. This is done by using the SETFIELD function. I am not going to elaborate on functions and how to use them in this blog. We will cover expressions in future blogs....it will probably take 3 or more blogs just to cover expressions and how they are used.
Ok, I think I've covered some basic elements of how to use buttons in Adesso. Next time I will review Views, Filters, and Forms, and how you can use them to get to the data you want to see.
No comments:
Post a Comment