Friday, February 19, 2010

The Secret Sauce - An Introduction

On its own, Adesso Client is a pretty good tool to use to build database applications.  Sure, there are other, more powerful tools to build robust applications that run on PCs, but can they run on Pocket PCs and Windows Mobile?  And even if they can, can they run in offline mode, using a device's local database to store its data?  And even if they can do that, can they sync to an intelligent server that handles all the synchronization between the device database and a centralized database?  And even if they can do that, are they easy enough for non-database administrators to use, set up permissions, sync rules, audit trails, user groups, sync type, and conflict resolution?  Herein lies the power of Adesso.  The Secret Sauce, if you will.  Today we are going to taste this sauce, just a small taste.

Adesso Server - The Secret Sauce

In my opinion, Adesso Server is the easiest, most powerful sync server there is, bar none.  Because its easy to use, it makes it that much more powerful.  I've used PenDragon, iAnywhere, Visual CE, and Bright Software.  And what I mean is that I've actually purchased, installed, and tried building apps using these other products.  I also know of people that swore by iAnywhere, SQL Anywhere and Visual CE, until they started using Adesso.  Nothing compares to Adesso Server.  Its the brains behind the system.  Its why people use this stuff.  Without it, Adesso is just another database system like all the others out there.

The SyncAdmin Web Portal

When you first log into the SyncAdmin portal (it's typical URL is http://serveraddress/SyncAdmin/), you will see a page like the following:


The left pane is the main navigation of the site.  the screenshot above was taken of our ASP version of Adesso Server.  This is the server version that we use to host multiple accounts.  If you are hosting your own server, your version of Adesso would be the Enterprise Edition, and would look slightly different than the one illustrated above.  We will talk about the Enterprise Edition version later in this blog.

The most important section of the portal is the Managed Accounts section.  When you click on it, you will see the following screen displayed.


In the left pane you are presented with a list of accounts.  In the main pane, those same accounts are displayed with some basic statistics.  

If you click on one of the accounts in the left pane, the screen will refresh, with a list of databases that are associated with that particular account, and some details of that account in the main pane.


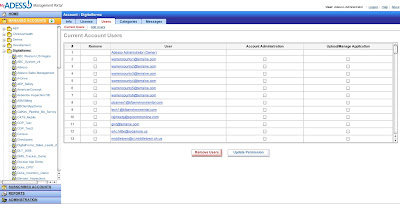
Notice that several tabs are now listed in the main pane.  The most important tab is the Users tab.  From here, you can add users as subscribers of a particular database.

Adding Users To An Account


To add a user, simply click on the Add User link below the menus.  To change a particular user's rights, click on the box to the left of the username, then click on the boxes to the right, and click on the Update Permissions button.  It's that simple. 

Now, please note that there are two levels of users...first you have to add a user to an ACCOUNT.  Then that user will be available to be added to an application, but you have to actually add that user to the database application in order for that user to see the app.  By default, users added to an account don't have access to any applications in the account until they are actually assigned to that application.  This is done in the next step I will show you.  

Adding Users To An Application

To add a user to an application, expand the account name on the left pane (if its not expanded yet).  Then click on an application in that list.  In the example below, I have clicked on one of our legacy applications, EnvironPro2009.  This app is used by our field technicians, geologist, and project managers to collect and manage low-flow groundwater data by our field technicians.  This application is also used by other environmental firms for the same purpose.


Notice that the main pane refreshes and you are presented with a new series of menus on the top.  From the first tab, the Info tab, you can assign someone who has admin rights to the account as the admin for the application.  You can also flag the application to become a template to create other applications, and you can even propagate changes and data from this "parent app" to all the instances you create.  More about this awesome feature will be covered in a separate blog post. Very powerful feature that requires its own blog post.

To add a user to the app, click on the users tab.  Your screen will look like the following:


If a user has access to the account (as I showed you previously), he will appear on the left window.  To add him tot he application, highlight his name and click on the Add button.  It's that simple.  Once you add a person to an app, you can then control that person's permissions and sync rules from this same area.  To do this, simply click on the Permissions tab (its a submenu below the top menus on the main pane).

User Permissions


Notice that in the main pane, you are presented with several columns:

  • Table - the table name in the database
  • Read - displays list of fields that, if highlighted, the user can read/view
  • Modify - displays list of fields that, if highlighted, the user can modify values in records created by others
  • Add - if checked, allows the user to add records to that table
  • Delete - if checked, allows the user to delete records from that table
  • Export - if checked, allows the user to export records from that table via the Record>Export menu in Adesso Client
  • Modify Owned Records - if checked, allows the user to edit his own records after they are created and saved to the local device database
  • View - displays list of views that, if highlighted, the user will see on his copy of Adesso Client

In essence, from this screen, you can control EXACTLY what you want your user to see and do, down to the table and field level.  you can control- or shift-click to select several fields from the Read, Modify, and View columns.  In the Read and Modify columns, there are also "All Fields" and "No Fields" options.  When you first add a user to an application, by default it allows a new user to read all the fields in all the tables, and locks out a user from being able to modify values in records created by others.  That's what the Modify column is all about...for example, if User X creates a record for Table 1 and syncs, you can control whether or not User Y can edit a specific field in that table created by User X.  To give him rights to edit a specific field, simply highlight that field on that table for that user.  

If you want a particular table to be hidden from a user, just click on "No Views" in the Views column for that particular user.

Application Designer (Modify Schema) Permissions

Notice that on the Permissions screen, there's a checkbox for Application Designer permission.  If that box is checked for a particular user, then that user will be able to open the Application Designer in Adesso Client and will be able to modify the application schema...tables, fields, views, forms, etc.  If the checkbox is unchecked, the Application Designer menu will be grayed out/inactive on his copy of Adesso Client.

Sync Settings

The second part of controlling what a user can do and what he can see in a particular application is handled via sync settings.  When you click on the Sync Settings link, your screen will look like this:


From this screen you can click on a particular user, then a particular table, select a particular type of sync, and even the type of conflict resolution.  Depending on the sync type, you can even add sync rules/queries that will control which records are pushed up to the server from the client or vice versa, down to the client from the server.  All of this can be done at the table level, meaning you can change any of these parameters for a particular user for a particular table.  In other words, you can have a particular type of sync (client to server) for one table, and have a completely different type of sync type (bi-directional) for a different table for the same user.  Very simple to use.  The sync types are as follows:

  • Bi-directional - data gets sent first from the client to the server, then back down to the client from the server
  • Server-to-Client - Sends records from server to client only
  • Client-to-Server - Sends records from client to server only.  When a user creates records on his device, it stores them locally, and can be viewed in grid view.  Once the user syncs, all the records are uploaded to the server and his grid view for that table is cleared out
  • No Sync - data on table doesn't get synced at all
Conflict Resolution

There are 4 conflict resolution types available, and a different type can be assigned to different tables.

  • Ask User - during sync, if a conflict is detected, a window pops open, the server record and the client record are displayed side by side in this window, with the conflict field highlighted in bright green.  The window contains controls to tell the server how to handle the conflict: overwrite the server record with the local record, overwrite the local record with the server record, or keep both records.  For each conflict, it will display this windows unless the user clicks a box in the window to treat all conflicts in the same manner
  • Client record overwrites server record
  • Server record overwrites client record
  • Keep both records
Like I said earlier, you can assign a different conflict resolution to different tables for a particular user.  By default, when you first add a user to the application, it will assign bi-directional sync settings and "ask user" conflict resolution to each table.

Sync Rules

Sync rules are used to control the data going either up to the server from the client and/or down to the client from the server.  Sync rules are typically uses for instances where you want to have bi-directional sync type, but you want to control the records being pushed down to the client for a particular user or user group.  When you use Pocket PCs and small Windows Mobile devices, you don't want to clog up the device with thousands or even hundreds of records...if you do, the PPC will either run ridiculously sluggish or won't run at all.  Those devices have a limited amount of RAM and aren't meant to handle hundreds of records.  That's what the sync rules are for.  Another benefit of using a sync rule is that you can use them to push only records to someone that meet a specific criteria, like a project number or company name, for example.  This allows you to use a single database and use it for multiple departments, companies, groups, teams, etc, and no one on one team/group/dept/company would see what another group sees...they would only see what is relevant to their own group.

The screenshot below illustrates a bi-directional sync type with a rule inserted in the server-to-client direction:


In the example above, we are passing records FROM server TO client that meet the following criteria:

[Project_No] LIKE '05-53014%' OR [Project_No] LIKE '07-71009/2%'

The syntax above follows certain rules:
  • Fieldnames are enclosed in brackets ( [ and ] )
  • LIKE is the same as "contains"
  • text to search for needs to be enclosed in single quotes ( ' )
  • the wildcard symbol is the percent sign ( % )
  • the wildcard symbol can be placed at the beginning of the text or at the end
Build Sync Rule Helper

You will also notice that there is a button called "Build Sync Rule".  If you click on it, a new window will appear that looks like the following:


On the left pane of this new window, all the fields available for this rule will appear.  On the right pane, different functions appear.  Several controls like AND, OR, NOT, =, <, >, etc appear.  Toward the bottom some instructions are displayed.  Once you have built your rule, simply click on the "Done" button to push it out to the sync rule direction box. 

Advanced Sync Rule Link

If you feel up to it, there's also an advanced sync rule link, that, when clicked, displays a slightly different sync rule box with a help screen to guide you on how to build a proper sync rule.  Your screen should look like the following if you click on this advanced sync rule link:


User Groups

If you don't want to mess with assigning permissions and sync rules to every single user individually, you can do this using user groups.  Let's say that you have 100 users, and 75 of them are field folks that are only going to enter records, 20 other people manage the data in-house, and 5 others need to access the database schema to make edits to it.  Rather than going through each of the 100 users manually, which can take forever), you can set up 3 groups to handle this.  What you would do is create a Field Team group, a Data Manager group, and a Database Designer group.  To set these groups up, click on the User Groups tab on the top of the main pane.


From this screen, you can create, rename, and delete groups.  This is pretty much self-explanatory.  Nest you will want to push users to specific groups.  To do this, click on the "Group Users" link.


Simply click on the group from the top scroll window, click on view, then find the users you want to add to the group, and click on the Add button.

A FEW NOTES ABOUT GROUPS: 
  1. The groups feature does not currently support cascading groups.  What I mean by this is that you can't add a group into another group, and so on.  
  2. When you add a user to a group, that user then is assigned the permissions of that group.  However, if you then change that particular user's permissions individually through the users tab, then those changes override the group permissions.  
  3. If you want to refresh a particular user's permissions because you edited that user's permissions manually from the users tab, remove that user from the group and add him back in.
The rest of permissions and sync rules for Groups is the same exact process as what I described in Users.  So there's no need to explain this.

Send Messages to Users

The SyncAdmin portal also has a feature to allow you to send messages to the users.  Pretty simple feature.  Screenshot is displayed below:


Sync Activities

This particular feature allows you to view every single sync activity that has been conducted on the server for a particular application.  When you first click on the Sync Activities tab, your screen will refresh and look like the screenshot below:


From here, you can enter a date range, an optional user credential, an (optional) machine name to search for, and a sync status type (succeeded, currently syncing, aborted, and failed).  There are also two other checkboxes to the right:

  • Show All Sync Details - lists every single sync item.  By default, this is not checked.
  • Show WS Calls - lists web services calls.  By default this is not checked.
If you provide a date range, but and leave the checkboxes unchecked, if there was activity on the server, it would look like the following:


If you click on an expand button for one of the rows, you will see all the details for that one sync session, similar to the screenshot below:


If, before you click on the View Report button, you had checked both checkboxes, your screen would look something like this:


Advanced Features

If you click on the Advanced Features tab, you will be presented with the ability to change the sync order of the tables, and also be able to add an audit trail to your application.

Sync Order

If for some reason, you want to have a specific order of syncing tables, you can do this from this screen.


Audit Trails

If you want to add an audit trail, click on the Audit Trail link.  Your screen will refresh and look like the following:


From here, you can create an audit trail for any type of event.  Events are defined as the following:

  • Add Record
  • Modify Record
  • Delete Record
  • Modify Field(s)
A note on audit trails: if you create an audit trail, please be aware that your database can grow rapidly.  This is because a new record will be created in a new table called "Audit" for each event you are auditing.  If you decide you want to know when a new record is added, deleted, and modified, up to 3 audit trail records will be created for each record in a particular table.  We can discuss this is more detail at a later time.  Suffice it to say that you need to be careful when creating audit trails.  And you probably only want to record if a record has been edited.  you can control delete capability from user permissions, so if deleting records is an issue for your application, simply eliminate this permission type for all users of the app.  Simple as that.

We haven't even discussed reporting, subscribed accounts, and server admin.  We will discuss those things in a later blog post.  Hopefully, if you have actually read this post, you should see how relatively easy it is to manage user permissions and sync rules, and monitor activities occurring on your server.  It's really simple.  Really.  That's the power of the secret sauce.  Simplicity that normal humans like me can understand.  At least I think I'm a regular normal average Joe...


Wednesday, February 10, 2010

Locking Records Function - How to ensure that records in Adesso are absolutely uneditable

One of our clients asked us how we could essentially lock records so that they would be completely uneditable, even by the user that created them as well as the Adesso Administrator (a.k.a. the god-mode dude).  While you can control some of these permissions from the SyncAdmin portal, the Adesso Administrator could still technically edit whatever he wants.  So we ended up implementing some new code last year into the Adesso source that completely locks entire records from being edited by anyone.  The business case for this functionality is to ensure that records that were created by someone are not altered at all at a later date, ensuring the validity of the data stored in that record.  This is important in medical records and other highly personal or security-prone data.

Today, I am going to explain how to create a button that, when clicked, essentially locks out records completely, so that they are absolutely uneditable by anyone.

Locking a record consists of two components:
  1. three separate fields, one which stores a yes/no value, and two of which contain expressions
  2. a button control that, when clicked, triggers an alert window prompting you to be sure that you want to proceed, and then, if user clicks ok, executes the expressions in the new fields

Step 1 - Create the Fields

You will need to create 3 fields in the table where you want to use record locking:
  1. Field Name: “Record is locked” , data type: “Yes/No”, Display: “Checkbox”
  2. Field Name: “Locking expression”, data type: “Yes/No”, Display: “Expression”, LOCAL FIELD checked, Expression text: “LOCKRECORD([Record is locked])” (no quotes)
  3. Field Name: “Lock record button expression”, data type: “Yes/No”, Display: “Expression”, LOCAL FIELD checked, CALCULATE VIA BUTTON ONLY checked, Expression text: “SETFIELD([Record is locked], GETSYSPARAM(11, "Are you sure you want to lock this record? This cannot be undone"))” (no outer quotes, of course)
The following screenshots illustrate what these fields look like in the field editor.

 
This is the "record is locked" field.


This is the "locking expression" field.  Note that local field checkbox is checked.  This means that the value stored in this field won't get synced back the Adesso Server.   


This is the "lock record button expression" field.  Note that it too is a local field, but also observe that the expression contained in this field is triggered only via a button control (checkbox on bottom right of expression editor).
  

Step 2 - Create the Button on the Form

 Now we simply need to create a button control that triggers the "lock record button expression" field we created in Step 1 above.  To do this, open the form for the table where you want to lock a record, add the button to that form, select "calculate expression" from the action menu, and then select the "lock record button expression" field from the dropdown below the action menu.  The screenshot below illustrates this:

 
To add a button, simply click on an empty row and select "button" from the popup menu (its located close to the bottom of the popup menu)


The main point here is to create a button, select the "calculate expression" action, and then select the field you created that stores the SETFIELD and GETSYSPARAM code.  We are calling this field the "lock record button expression" field.


When you click on the 'appearance tab in the button designer, you need to click on the 'Disable on click' checkbox, and then change the colors to something different from the colors when the button is active.


Test Your Code in Runtime

Once you have completed Steps 1 and 2, it's time to test your code.  If you built this correctly, when you click on the button in runtime, you will get an alert message like the following:


When the user clicks on the button, the GETSYSPARAM (11) alert message pops up, displaying the alert message text that you entered.


Notice that after the user clicks on the 'Yes' button on the alert message, the 'finalize record' button greys out.  This is because we set the button to be disabled upon click and to change to default colors for background and text.


Once the user clicks clicks 'yes' on the alert message, and then on the OK button of the form, then the record will lock and will become completely uneditable.  

VERY IMPORTANT NOTES:  
  1. Validation controls are triggered upon clicking on the OK button on the form.  What this means is that if the user clicks on the 'yes' button on the alert message box, and then on the ok form button, and some validations are not met, the validation controls will appear as a popup, preventing the record from actually being saved to the database.  If this happens, then the record will NOT become uneditable.  Rather, it will revert back to the state of the record before clicking on the 'finalize record' button.  What this means is that all validation rules will need to be met before the record can be saved to the database and thus become locked.
  2.  Records can still be deleted if user credentials on the Adesso Server SyncAdmin allow delete permissions.  If you want to ensure that nothing ever gets edited or deleted, use the locking record function described in this blog AND make sure that no one has delete permissions on SyncAdmin.  The following screenshot illustrates where to find this delete permission on SyncAdmin:
  
Notice that there is a delete column with checkboxes unchecked in this example.  If the checkbox is UNCHECKED, then the users in that group cannot delete records from that table.


Sunday, February 7, 2010

Views - It's All About the View

Today I am going to talk about Adesso Views...how to build 'em, how to manage 'em, how to add filters to 'em, etc etc.  What are Views for?  A View is the very first thing you see when you open an Adesso application.  think of Excel...what you see when you open an Excel spreadsheet is a series of workbooks listed on the bottom of the spreadsheet, and when you click on a worksheet, what you see is usually a huge grid of columns and rows.  That's essentially what an Adesso View is...a listing page that displays all or some of the records in a particular table.  With Views, you can narrow your listing to a subset of all the records, you can sort by clicking on the column headers, you can expand and shrink the column headers, you can group subsets of records that share common values for certain fields, you can even display a few basic math functions (minimum, maximum, average, and sum).  Bottom line: Views are very versatile in Adesso, and you can have as many as you want.

For teaching this topic of Views, I am going to use an application we built for the US Army Corps of Engineers as a demonstration on how our software could be utilized to conduct power assessments using Adesso.  This database was built to showcase how Adesso could be used to replace paper forms with a digital system capable of capturing kilowatt, voltage, and other data for life sustaining facilities so that the Army 249th Battalion, whose mission is emergency generators, could supply the proper emergency generators to facilities if a natural or man-made disaster occurred.  Its a bit more complex than just going to Home Depot to pick up any 'ol generator and getting UPS to deliver it!  Anyway, lets get started on Views.

Adesso Views Designer

The Views designer in Adesso is used to create grid views that look sort of like what an Excel spreadsheet looks like: a bunch of columns and rows of data.  An Adesso view behaves like Excel in many instances, but Adesso is a database engine, not a spreadsheet, so it can do a lot of things that Excel can't do, but it also can't do a lot of things that Excel can do (like complex mathematical calculations, cut and pasting from cell to cell, etc).  The views designer screen is illustrated below:


Whenever you create a new view, it will appear in the right pane in the image above.  If you want to sort the list, click on either the Name or Data Source header and it will sort the list by that column.  To create a new view, click on the 'New' button on the bottom of the Views designer window.  Once you do that, a new window will appear on your computer that will look like the following:


You will be prompted to give your view a name.  What should you call your view?  Whatever you want.  I tend to name my views by the name of the main sorting function in that particular view.  In other words, if I create a view and set it so that that particular view, when first opened, sorts by column X, then I would name that view "by Column X".  By doing it this way, my users already know by just looking at the view that the records in that view will be sorted by Column X.  Easy as pie to understand.  

The only other option in the screen above is the data source you will use for your view.  Data source is just another big term for table.  When you click on the data source dropdown menu, all the tables you have created in your application will be available as a data source.  Simply pick one from the dropdown, name your view, and click on ok.  (You can change the view name later, so don't get paranoid about getting the name just right).

Once you select a data source and a name, and click on the ok button, you will see the following window:


Notice that there are several tabs across the top of the window.  When you first create or open a view, the first tab to be displayed is the Columns tab.

Columns Tab

The columns tab (shown above) displays 2 separate panes:
  • The left pane lists all the fields available to you to insert into the view.  
  • The right pane lists all the fields currently in the view.
To move fields from the left pane (the available fields) to the right pane, simply click on the Add arrow or All arrow buttons in the middle.  If you made a mistake and want to get rid of a field in the view, click on the Del arrow button.

Now notice that there's a dropdown menu on the bottom left of the screen.  That particular dropdown menu will list tables that are available to the view because a relationship has been established between the table being used as a data source for the current view and the table in the dropdown list.  If you click on the dropdown, it will look something like this:


If you select a different table from this dropdown, the list of fields in the left pane will change to display the fields that are inside that particular table.   Notice that in the next screenshot, I have selected the Facility table, and also notice that the left pane contains a totally different set of fields.


Notice that the left pane now displays fields but now each fieldname also is followed by a the relationship name inside parentheses.  For example, the field mission_no is represented by mission_no(Facility(Assessment-Facility)).  The reason it is listed this way is to give you a visual cue that that particular field is not a field that is contained inside the data source table that you are using for this particular view.  Rather, it is a field that can be made available to the view because of an established relationship between the data source table and the table that that particular field belongs to.  Simple as that.  

Now that you understand how to place fields in a view, lets go ahead and do that now.  I have labeled this view "by State".  What I mean by this is that in this view, I want to sort the records by US State.  That means that at a minimum I should place the field 'state' in the view.  Ok, I added a few fields to the right pane.  Screenshot is displayed below:


Notice that in the right pane, there are some arrow buttons on the bottom.  These arrows are used to push fields up or down.  The double arrows push a record all the way to the top or all the way to the bottom.  To move a field, click on it once and then on the arrow.  Pretty basic.

In an Adesso view, as in Excel, fields are displayed in columns from left to right.  In the view designer, the topmost column will display as the leftmost column in runtime mode, and the bottommost column will display as the rightmost column in runtime.

Min, Max, Average, and SUM Functions
Did you notice another small dropdown menu to the right of the arrows?  That dropdown gives you the ability to run basic calculations on one or more numeric fields.  NOTE: this will only work for integer and float data types.  The available functions are:

  • MIN (this will provide the minimum value for the selected field(s) in the entire recordset displayed, including group headers)
  • MAX (this will provide the maximum value for the selected field(s) in the entire recordset displayed, including group headers) 
  • AVG (this will provide the average value for the selected field(s) in the entire recordset displayed, including group headers) 
  • SUM (this will provide the sum total in the entire recordset displayed for the selected field(s), including group headers)
To run more than one of the functions on a given field, click on the dropdown more than once while highlighting the field you want to perform the function on, and continue selecting the functions you want to run.  The field displayed in the right pane will refresh and display, in parentheses, what functions will be calculated for it in that view.


Ok, so in this particular view, I want to know the total kilowatts needed by State.  How do I do that?  First step is to highlight the kw field and select SUM from the bottom dropdown menu.  Your screen should look like the following screenshot:


Notice that the field kw is now displayed as kw(SUM).  This denotes that this field will be summed, with the total sum displayed at the bottom of each grouping and the bottom of the entire recordset.

But wait!  Do you really want to have the City and State all the way to the right hand side of the grid in runtime?  Probably not, especially if we are going to sort the view by State.  So let's move the city and state fields toward the top of the right pane, just below mission_no.  Now our screen looks like this:


Headers Tab
Ok, now we know what we want to display, in what order, and that we want to total the number of kilowatts.  Now let's label the headers for each column.  Just to be clear, a header is simply the label above the column of data.  By default, the headers for views will use the default label stored from the field designer.  When you first started building your application, you probably built your tables first, and when you did, each field that you created had a 'default label', where you could assign something other than the fieldname as the default label.  The screenshot below illustrates what this looks like from the label designer:


Ok, now back to  the Headers tab.  When you click on the Headers tab, your screen will look like this:


The column header column (on the far left) is essentially the label that will be used to display the name of the column in runtime mode.  The fieldname is just that...the field that will be used for populating the column.  The miniview column width displays the number of pixels wide that the column will default to when you create a miniview (which is different from a regular view...more about this when we talk about Forms).  By default, the number of pixels is 80.  The alignment column determines whether the values in that column will be left justified, center justified, or right justified.  By default, text and date fields are left justified, numeric fields are right justified, and yes/no fields are centered.  However, you can simply click on the alignment column for a specific field and change the alignment by selecting a value (Right, Left, Center) from the dropdown.  When you click it, it will look like the following screen:


If you want to change the name stored in the column header, just click on the one you want to change, and change it.  Self explanatory.

Sort Tab

The Sort tab is one of the more powerful pieces of the View designer.  From here, you will be able to assign a way to sort and group your records.  When you click on this tab, your screen will look the following:

Notice that you can have up to 6 different levels of sorting, the first level being at the top of the window.  To explain how this works, imagine having a bunch of records that contain the same value for state, and fewer records that contain the same value for city.  For example, lets say you have 100 records, and 50 of them have a value of South Carolina in the state field.  Out of those 50, 25 have a value of Charleston in the city field, and 10 have a value of Hilton Head in the city field, and so on.  If you sort first by state in ascending order and group the records, and the second sort is set to city in ascending order and group those records too, what you will see in runtime is a header for South Carolina, with all 50 records in there but with two more headers: Charleston and Hilton Head.  Under the Charleston header, 25 records will be displayed, while under the Hilton Head header 10 records will display.

I have decided that for this view, I want to do what I said above, but also add one more level of sort, by facility name.  My screen looks likes this:


In runtime, my screen will look like this:

 Notice that because I told the view to group first by State, and THEN by city, you have a series of collapsible/cascading headers, each one expandable/collapsible by clicking on the + or - sign to the left of its name.  You can also expand or collapse headers all at once at different levels by clicking on the expand or collapse icons in the icon toolbar.

Finally, you should also notice that KW is now totaled at the bottom of each group, at each group level (denoted as TOT on the far left of each total row).  That's because we assigned the SUM function to that field earlier in this tutorial.

Let's get back to the Sort tab.  Notice that at the bottom of the sort tab, there is an Appearance section that lets you default the view (if you are using groups in the view) to either display all the records or not display them, and to either display the record count in the header or not display the record count.  The way this works is that if you tell it to display the group expanded, then when the user, in runtime, clicks open the view, by default the records will be completely collapsed, and the user will need to pop the headers open using the icons or by manually clicking on each header.  Let me show you what this looks like in runtime:


If you click on the expand icon once, your screen will refresh and look like this:

Finally, notice that there is a number in parentheses to the right of each header.  This is the record count.  If you want to hide this record count, all you need to do is click on the checkbox called "Hide record count in group headers".  This checkbox is listed at the bottom of the sort tab (screenshot is displayed below):


Print Tab

Unfortunately, there's not much in the print tab to work with.  This part of Adesso is admittedly weak, and we need to improve this.  Plans are to build a much-improved print feature in the next major release, Adesso v5 (we are currently on v4.1.3).  But for now, it's merely a way to create simple print output formats for record listings.  Printing detail forms is not supported currently...only grid view/record listings.

Events

There are two event types in an Adesso View:
  1. Create a new record
  2. Open an existing record
 The purpose of events is to allow the application designer to control the behavior of data entry and data record detail display associated with a view.  In other words, when a user wants to look at an existing record, he double-clicks on the record in the view.  When a user wants to enter a new record, he clicks on the "new Record" menu.  What happens next is controlled by these so-called "events".

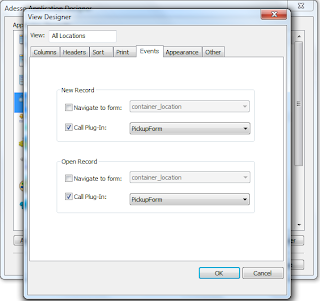
When you click on the Events tab, you will see the following screen:


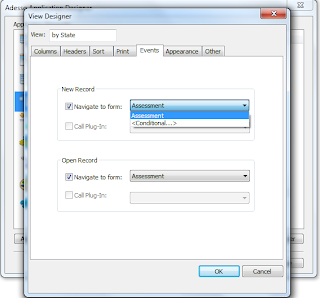
 Notice that there are two main functions on this screen: 1) New Record; and 2) Open Record.  you will also notice that for each of these event types, there are two separate options: 1) Navigate to form; and 2) Call Plug-In. 

By default, when you create a view, it will automatically use the default form for both types of events.  However, if you create multiple forms for a particular table, you can select a specific form from the dropdown menu for either event or both events.  Let's say you want to hide some fields if a user is going to open an existing record, but you want the user to see a completely different form with more fields in it if he is creating a new record. You can select a particular form for new record events and a completely different form for opening records.   To select from a listing of available forms, simply click on the dropdown box. 


If you only have one form, the dropdown will only contain that one form plus a conditional statement.  If there are more forms available for that table, they will all show up there, plus the conditional statement.  

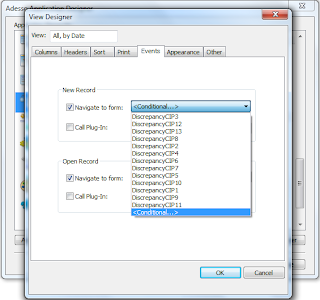
Let me show you what the dropdown menu looks like when you have created more than one form for a table.  In this new example app, we have built several forms for the same table.  Notice that they all appear in the dropdown, in addition to that conditional statement:


To select a form, simply select it from the dropdown.

Conditional Form Selection
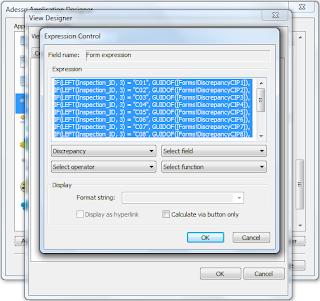
You can use the conditional statement to select one form or another based upon an expression, or condition in the record.  We will use the application in the example above.  When I click on conditional, the expression editor will appear, like the screenshot below:


You can create extremely complicated expressions, but its not too difficult and shouldn't scare you.  The complicated expression that I am using for this particular conditional statement is a series of nested IF statements.  The entire expressions is listed below:
IF(LEFT(Inspection_ID, 3) = "C01", GUIDOF([Forms!DiscrepancyCIP1]), IF(LEFT(Inspection_ID, 3) = "C02", GUIDOF([Forms!DiscrepancyCIP2]), IF(LEFT(Inspection_ID, 3) = "C03", GUIDOF([Forms!DiscrepancyCIP3]), IF(LEFT(Inspection_ID, 3) = "C04", GUIDOF([Forms!DiscrepancyCIP4]), IF(LEFT(Inspection_ID, 3) = "C05", GUIDOF([Forms!DiscrepancyCIP5]), IF(LEFT(Inspection_ID, 3) = "C06", GUIDOF([Forms!DiscrepancyCIP6]), IF(LEFT(Inspection_ID, 3) = "C07", GUIDOF([Forms!DiscrepancyCIP7]), IF(LEFT(Inspection_ID, 3) = "C08", GUIDOF([Forms!DiscrepancyCIP8]), IF(LEFT(Inspection_ID, 3) = "C09", GUIDOF([Forms!DiscrepancyCIP9]), IF(LEFT(Inspection_ID, 3) = "C10", GUIDOF([Forms!DiscrepancyCIP10]), IF(LEFT(Inspection_ID, 3) = "C11", GUIDOF([Forms!DiscrepancyCIP11]), IF(LEFT(Inspection_ID, 3) = "C12", GUIDOF([Forms!DiscrepancyCIP12]), IF(LEFT(Inspection_ID, 3) = "C13", GUIDOF([Forms!DiscrepancyCIP13]), "")))))))))))))

Notice the pattern here:  IF the first 3 characters in the field Inspection_id = "something of importance", then use the form labeled "DiscrepancyCIP1", ELSE, IF the first 3 characters in the field .... and so on and so on.

The syntax for forms is GUIDOF([Forms!FormName])

To simplify things, think of it this way:

IF(field_x) = "value you are looking for", GUIDOF([Forms!FormX]), GUIDOF([Forms!FormY]))
So, if field_x contains a specific value you are looking for, use FormX to display to the user when he creates a new record from that particular view, otherwise, use FormY to display.  Make sure your brackets and parentheses are correct.

I hope this makes sense.

Run Plug-In Event from a View
You can also run a plug-in event from a View.  That's what the checkbox is there for in the Events tab.  This feature is usually used to call an input form created in .NET, where you can build it to look however you want it to look like with no restrictions whatsoever imposed on you.  Let me show you one of those:


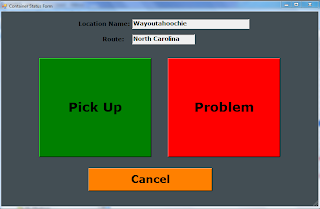
Notice that in this example view, instead of selecting a particular view created in Adesso, we are selecting a plug-in labeled PickupForm for both types of events.  Discussion of plug-ins is beyond the scope of this particular blog post (I will talk more about plug-ins in a separate blog post).  Although we are triggering the plug-in by itself, notice that you can trigger the plug-in AND select an Adesso form at the same time.  In our particular case, we only want to pop open our own customized form.  In runtime, when the user creates a new record from this view, it will run the plug-in, and this particular plug-in opens an input form of our own, as illustrated below:


What we wanted to do was create a form with 2 giant buttons only (along with a big cancel button).  While you could do this in an Adesso form, there are some functions running in the background when the user clicks on either button that cannot be done in a native Adesso form.  So we chose to build a plug-in in .NET to create a very specific form.

NOTE: if you use your own forms via the plug-in architecture, you need to know that you will need to create your own validation controls in .NET.  In a native Adesso form, you can create validation controls pretty easily, but they won't be available for custom forms...you will have to do this manually.

Appearance Tab

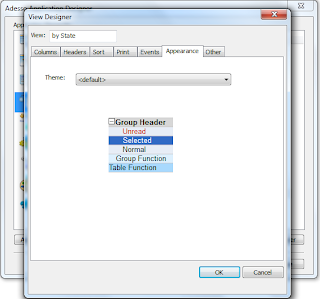
The appearance tab allows you to select a theme for the coloring of the rows, headers, fonts, etc.  Themes have their own designer from the main Application Designer screen.  Build a theme from there, and it will be made available in the dropdown menu from the themes tab.


Other Tab
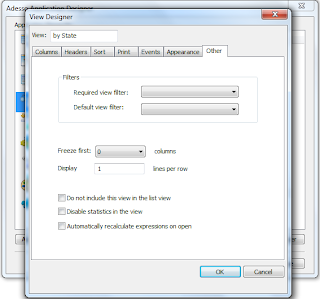
The most important part of the Other tab is the ability to assign filters to the view.  A filter can be created from the Filters Designer screen that is available at the main page of the Application Designer (see screenshot above).

When you first click on the Other Tab, it will look like this:


Filters
When you create a filter, it will be available from both the required and default filter dropdown menus.  You have to build the filters first before seeing them in the dropdown.  Once you build them, you can then select them.  We will discuss filters in detail on a separate blog post.

Notice that in the filters section of this tab, there is a required view filter and a default view filter.  A required filter is just that: the view will ALWAYS use that filter, and won't let the user de-select the filter.  The default filter means that the view, when first opened by the user, will use that particular filter as a default, but the user can take the filter off or change it to a different one.  
The freeze first XX columns is similar to Excel's freeze vertical pane feature.  You could freeze the first column, and when you scroll to the right, that column will always appear in the list.

The display XX lines per row defaults to a value of 1 but can be changed here.  

The do not include this view in the list view checkbox, if checked, means that users in runtime won't even know that that view even exists.  You may want to build invisible views that you use for 02m controls within forms, and for import and export templates that you don't want your users to see in runtime.

Disable statistics means that no record counts will be displayed in headers, etc

Automatically recalculate expressions on open means that when a user pops open a record, all the expressions in that table will recalc.