Thursday, January 28, 2010

Buttons Part II - A Closer Look at Button Actions

Today I watched a live feed from Engadget (http://engadget.com) and saw the unveiling of the Apple iPad.  Man, I want one of those.  That thing is awesome.  Makes my Kindle look like a piece of crap.  Heck, it makes Windows and Windows Mobile look like crap. 

I want our software to run on the iPad.  Fortunately, we own the source code for Adesso, and we have a few crack programmers who could probably make it happen.  All in time.  Maybe by the end of this year, maybe.  Ok, enough said about that.

On my last post, I talked about how to design buttons in Adesso.  Today we are going to look at a few of the more complex types of buttons, with the principal point of showing you real-life buttons, what they look like in runtime, and what they do.

Run Plugin Action

A few notes about plugins:
  • in order to run a Crystal Report plugin, you will need to have installed the Crystal Report runtime engine (its free and provided by SAP) on your PC. If you need it, email me and I can get it for you
  • in order to run a plugin that generates an Excel or Word document, you will need to have MS Office installed on your PC
  • in order to run a plugin that generates and displays a PDF document, you will need to have installed Adobe Acrobat (Reader, Standard Edition, or Professional)
  • Crystal Report windows lock Adesso until you exit the Crystal Report window, meaning you need to exit out of the Crystal Report window before you can do anything else in Adesso
  • External type plugins discussed here do not work on PocketPCs or Windows Mobile devices
The screenshot below illustrates 3 buttons that are used to generate a document in 3 different ways:
  1. Print TA - generate document and display it in a Crystal Report form
  2. Generate TA PDF - generate the document and display it in Adobe Acrobat
  3. Email TA to DENR Mgr - generate the document and send it as a link embedded in an email to the intended recipient


Print TA (Crystal Report Format)
This button is used to create a specific document and display it in a Crystal Report window.  When you click on the button, the form that displays will look like the following:


On the upper left corner there are a few icons.  The leftmost icon is an export menu, which, when you click on it, displays a dropdown menu that allows you to select a format to export to.  Choices include Crystal Report (.rpt), Word (.doc), Excel (.xls), .rtf, and xml.

NOTES:
  • in order for this menu to work, you need to have MS Office installed on your PC. 
  • Crystal Report will lock Adesso until you close the window.  This means that you will not be able to go back to Adesso while this window is displayed.

Generate TA PDF (Adobe Acrobat Format)
This button is used to basically display the same thing as a Crystal Report, but instead of using the Crystal Report window, which has export features, but which also locks down Adesso, it instead creates a PDF and pops it open in Adobe Acrobat (Adobe Reader works fine too, which is free).  Because it is opened in a separate application (Adobe Acrobat), you can continue working in Adesso independent of the Acrobat window.  However, you will not be able to export directly to Excel or Word, for example, since you will be inside the Acrobat application instead of Crystal Report.

When you click on the button, your screen will look like this:


Email TA to DENR Mgr (Generates an Email)
This plugin is a bit more complex.  When a user clicks on the button, the plugin will first pop a window open and request the username, it will then create a new record in a child table called TA_Status and will populate the status field with a value of "TA Submitted" and the status_date field with a value of NOW().  A server-side script running every hour (via Windows Task Manager) will then detect the new status record and assign a value of TRUE to the TA_submitted (boolean field) field in the parent table.  Once this is done, another script running every 2 hours will detect this value and a Null value in the TA_emailed field for the same record, and it will then fire off an email to the recipient, which in the case of this system, is the email address in the DENR table which is related to the TA table via the DENR_Incident_Manager field.  The email contains dynamic subject line and some dynamic text in the body of the email, all coming from values stored in the TA and related Project and DENR table records.  A link is provided in the email body that, when clicked, navigates the DENR Manager who clicks on it to a website login page.  Upon login, the exact same form that you see above pops open, but this time in an editable web browser window.  Almost all items in the browser window are editable, and edits made in this window, once saved, get pushed back to Adesso.  A screenshot of the web browser TA edit screen is presented below:


What is Under the Hood to Make This Work?
Let's take a look at how these plugins triggered from buttons actually work.  First step is to pop open the Application Designer, go to the Forms Design section, and find the TA form.  Screenshot is displayed below:


When I click on the Print TA button, the button designer appears, as illustrated below:


The core of the functionality produced by the button is the Run Plug-in action.  Notice that when you select "Run Plug-in"action from the action dropdown, the dropdown menu below will populate with the plugins stored in the plugin designer section of the application  Notice that the plugin being called by this button is labeled "PrintTAFormReport".  Now we know that we need to look for this plugin in the Plugin designer section of the Application Designer.  So the next step is to close the button designer and the form, and click on Plugins from the left pane of the Application Designer.  When you do this, you will see all the plugins that have been created for this particular application.  One of them is called PrintTAFormReport.  Double-click on this plugin to take a look at it.


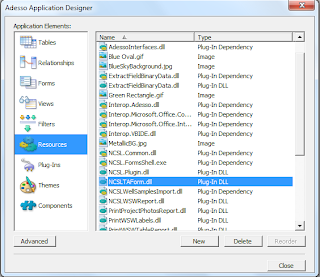
The main piece here is that this particular plugin is calling a resource called NCSLTAForm.dll and allowing buttons, expressions, and events to trigger the use of that DLL.  In a nutshell, you need to design the DLLs outside of Adesso and import them into Adesso.  In its current state, Adesso DLLs should be created in Visual Studio 2005, and they need to target/be compiled for .NET 2.0 Framework.  We will be updating Adesso to .NET 3.5 sometime this year.

To import your DLL into Adesso, you need to navigate to the Resources section of the Application Designer and click on the New button on the bottom.  Your screen should look like the following.  Notice that the DLL called NCSLTAForm.dll is in there.


Both of the other 2 plugins (Generate TA PDF and Email TA to DENR Mgr) operate under the same concept:
  1. Create a form or .NET executable in something else like Visual Studio 2005
  2. Generate the DLL from your external application and import it into the Resources section of the Application Designer
  3. Create a plugin from the Plug-ins section of the Application Designer
  4. Select the appropriate resource for your plugin, and give it rights to be used by buttons, expressions, and/or events as appropriate
  5. Add a button to your form, select "Run Plugin" action and then find your plugin in the plugins dropdown menu.

 Read GPS Action

 This action is a much simpler one to create...no DLLs or external applications to worry about...you can do this right from within Adesso in a matter of a few minutes.  The basic principal behind creating code that can read a GPS device is as follows:


  1. Create your GPS fields in your tables first.  They must be of float data type and of display type GPS.
  2. Add your fields to a form
  3. Add a button on the form and assign it an action of Read GPS
  4. Make sure that the correct port is assigned in the Preferences menu in Adesso Client runtime mode
The following screenshot illustrates what the form would generally look like:


In the form above, I created a big red rectangular button that has a label on it "Update Lat/Long from GPS".  Below the button I have two fields that would populate with values read from the GPS device.  The last piece in this puzzle is that your device needs to be connected to a GPS device.  Many PPCs come with integrated GPS devices built-in.  And some use compact flash slots or SD cards for the GPS.  regardless of the type of GPS device, you need to assign a port number in the preferences section of Adesso Client (Tools>Preferences menu).  A screenshot of this is displayed below:


Field types that you create to assign latitude, longitude, and altitude should be float type.  The field designer is illustrated below:


The dropdown menu in the GPS Control has several options which you can select to read from your GPS device.


Finally, to create a button that can be used to read the GPS device, simply add a button to the form where your GPS fields are, and select "Read GPS" from the action dropdown.  Your button designer should look like the following:


New One-To-Many Record

This action type is very popular and powerful.  You can use it to create child records from a parent table.  When you do this, the fields in the child table that are connected to the parent table through the 02m (one-to-many) relationship automatically pre-populate with those values.  This makes it nice because the child record will retain the relationship to the parent record as long as there is uniqueness within the relationship.  An example of this type of button is illustrated below:


Typically, this type of button control is used on the same tab as an 02m grid that is used to display the child records that are related to the parent record displayed on the form.  In the example above, the 02m grid is displayed above the large button labeled "New Line Item".  In the Application Designer, the form looks like this:


The button control is very simple.  It is displayed below:


To trigger this type of button action, all you need to do is select "New One-to-Many Record" from the Action dropdown menu, and then select the correct relationship from the Parameter dropdown menu.  Of note here is that the relationship that you select must be on the same tab on the form.


New One-To-Many Record Using Tags

A second way to create child records from a parent record using a button control is to select an action type called New One-to-Many Record Using Tags.  This action type is useful when you have more than one form for a table.  It is basically used to navigate the user to the correct input form for a table that has several forms.  In runtime, the button looks exactly the same as any other button.  But in the Application Designer, you have to do a few things to get this action right.  A screenshot of the an example form is illustrated below:


In this particular form, there is a 02m (one to many) grid above the button.  That particular 02m table has several forms associated with it, so in order to open the correct form, we can use tags.  If you double-click on the 02m grid, you will see the following 02m designer screen:
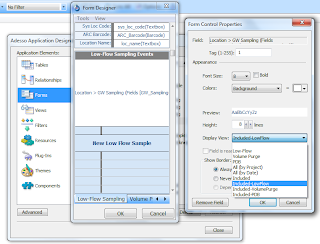


Two important things to notice about this screen:  the Tag number (top part of the form control properties window), and the Display View dropdown menu.  The Display View menu, when clicked, will show you several views available for the 02m, as illustrated below:


Each view listed in that dropdown has different filters and form events assigned to it.  Let's take a look at the view that we have selected: IncludedLowFlow:
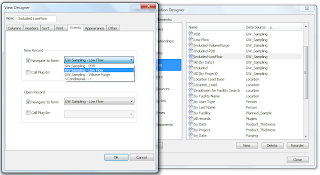


Notice that in the Events tab, you can navigate to a specific form for two different action types: creating a new record, and opening an existing record.  For this particular view, we have chosen the GW Sampling - LowFlow form, a very specific form with certain fields and tabs on it.   Since this view has a specific form assigned to it for both action types, if the user navigates to this view, then if he opens an existing record or creates a new record from that view, it will open that very specific form.  So, long story short, if you want to create a button that will navigate the user to that very specific form, you need to use the button action of New One-to-Many Record Using Tags and assign the correct tag number on the 02m grid that navigates the user to the specific form you want to open.  Lets go back and take a look at the 02m grid properties.  Notice that the tag ID assigned to it is 1.  You can give this tag any number between 0 and 255.  Default ID is 0.  We have chosen to give it an ID of 1.  All you really need to do at this point is make sure that the Tag ID in the parameters box below the button action is the same number as the tag ID in the 02m grid properties.  Since we assigned it a value of 1, then the parameters box has a value of 1 in it as well.  That's how this works.  Once you do that, the correct form will appear when the user clicks on that button to create a new child record.


Calculate Expression Action


This is one of the more powerful button features in Adesso.  With this feature, you can trigger a calculation, an action, etc with the click of the button.  You can also disable the button after clicking on it once, thereby giving you additional control on when the button can be clicked.

To use this action, there are several steps.  We will peel back, or reverse engineer, how this functionality operates in Adesso.  Let's take a look at an example button that uses this feature:


In this example application, we are going to take a closer look at the BP Presented button.  It's the one on the top left of the form window.  This particular application was built as a demonstration on how Adesso could be used to track the amount of time it takes an airline passenger to go through security at an airport.  In the case of the BP Presented button, we want to be able to click the button when the passenger hands his boarding pass (BP) to the TSA employee.  In the background, when the button is clicked, several actions are being performed:  a time stamp is stored in a field; the button becomes disabled; and the foreground color of the button changes.  In this particular example, we are disabling and changing the color of the button programmatically, but it can also be done through the button GUI.

In runtime, if the user clicks on the BP Presented button, it will become disabled and change colors, as depicted in the screenshot below:


Notice that the button now has a white background.  Although the user doesn't see it, a timestamp is also created and stored in a separate field.

Let's take a look at what's going on behind the scenes.  A screenshot of the main form and button designer is presented below:


Ok, notice that the button action is "Calculate Expression", and the Field dropdown menu has a field labeled "B_BP_Pres".   Basically, when you select "Calculate Expression" from the action menu, you will then be able to select a specific field from the list of all the fields in the table associated with the form.  All you need to do is select the field that contains the expression you want to run, and presto!  it's done.  Ok, not so fast.  Let's take a look at that field that we selected, and see what it says:
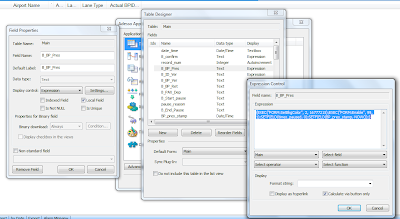


A fe things to notice.  In the Field properties box (on the left in the screenshot), you will notice two key elements: Is Local is checked, and its an expression display type.  Is Local is checked because you don't want to sync the values in this field back to the server...there's no need to do that, this is a local action only, and other users using this field will have different values in that field when they use it, so the chances of creating conflicts during sync increases if this checkbox remains unchecked.  Remember that local fields don't pass the values in them back to the server...they are treated as null values.

When you click on the settings button (next to expression display type), the expression editor appears.  A key element here is that "calculate via button only" is checked.  What this flag does is disables the expression from running EXCEPT when it is triggered by a button.  You don't want to trigger this expression every time the user opens the form...only when the user clicks on the button.

Finally, the expression itself

{EXEC("FORM:SetBkgColor", 2, 16777215);EXEC("FORM:Enable", 99, 1);SETFIELD(times_paused, 0);SETFIELD(BP_pres_stamp, NOW());}

Is a series of functions separated by the semi-colon, and all within curly quote {} brackets.  If you want your expression to do several actions, that's the syntax that you need to use.  Notice that we are assigning background colors, then disabling the button all programmatically.  This can now be done by using the button designer GUI.  The last 2 functions in the expression above are assigning values to other fields.  This is done by using the SETFIELD function.  I am not going to elaborate on functions and how to use them in this blog.  We will cover expressions in future blogs....it will probably take 3 or more blogs just to cover expressions and how they are used.

Ok, I think I've covered some basic elements of how to use buttons in Adesso.  Next time I will review Views, Filters, and Forms, and how you can use them to get to the data you want to see.




Wednesday, January 20, 2010

Buttons, Buttons, Buttons! - How to Create Buttons on Adesso Forms

On my last blog, I wrote about Pesto Garden, Inc., and how to build a bathroom quality control inspection system.  I mentioned that I would continue tweaking that app, but I feel like tackling something more interesting today: buttons.  Today, I am going to dive into button controls...how to build buttons and assign them actions on an Adesso form.  This will be part 1 of 2 (or 3) parts.  This first part we will review the button designer and what you can do with it.  In part 2 of this blog series, I will show you some real buttons in real applications that I have built, and what actions those buttons perform under the hood.

Where are button controls found?
To create a button in Adesso, you must first create a form. Once you have built a form from the form designer, simply click a blank row and select "Button" from the popup list.  A screenshot of this is illustrated below.


Once you select "Button" from this popup menu, your screen will look like the following:


 While this window appears simple enough, there are quite a few controls here.  Notice that there are two tabs: an 'Action' tab and an 'Appearance' tab.  The Action tab is exactly that...specifying the action that a click on this button will perform.  The appearance tab specifies what the button will look like.  We'll take a look at the action tab first.

Action Tab
The two main items on this tab are the Type dropdown menu, and the action menu.  There's also a field to specify what the label on top of the button should read, and something called a Tag.  Lets first look at the Type dropdown.

Type Dropdown
The Type dropdown menu has three different values in it:
  • Standard
  • Hyperlink
  • Image


When you first create a button control, it will default to Standard.   

  • Standard buttons are exactly what they sound like...basic buttons with some basic color and appearance settings found on the 'Appearance' tab.  
  • Hyperlink buttons are simply links, that when clicked on, navigate to a particular URL or perform some action specified in the Action dropdown.
  • Image buttons are button controls where you can specify images for two separate states of the button: when inactive, and when a user clicks, or presses on it.  Adesso comes with several button images stored in folders, and you can drop additional images in those folders, or navigate to your hard drive to select a specific image.  Images can be anything...rectangles, arrows, icons, etc.  

If you select Image from the Type dropdown, two additional parameters will appear in your window, as illustrated below:


 The two additional parameters are Regular and Pressed.  Regular means what the button looks like in inactive state.  Pressed means what the button looks like when a user clicks or taps on it, and remains that way while the button is pressed, then reverts back to Regular once the user releases the button.  There is an icon with three dots to the right of each dropdown.  If you click on that icon, a navigational window will appear that will allow you to navigate through your hard drive to find and select an image.  The dropdown will display recently used images for faster selection. 


Standard Image Folders in Adesso
When you first install Adesso, two image folders will install on your computer.  These are found at the Application level, typically at c://Program Files/Adesso Systems/Adesso/  What you will find are two folders, labeled ButtonShapes and ButtonShapesPressed.  See screenshot below:


If you open the ButtonShapes folder and view the items, you will see the following default button images:


Now, don't get me wrong here, these are not just ugly images, they are FUGLY with a capital F.  However, what you need to understand here is that these are simply basic button images in folders...yes, folders.  What this means is that if you have your own graphic-artist quality images that you want to use for buttons, just copy them into these folders, and presto!  they will be available for your app right from here. 

The ButtonShapesPressed folder includes very similar images, but with slightly different colors/gradients.  By using these in pressed mode state, the user will see a slight change in the button when he clicks on it, giving the illusion of a click action.  The screenshot below illustrates what the ButtonShapesPressed folder looks like.


Action Dropdown
The action dropdown is what I call the brains of the button controls.  It is the part that does all the hard work.  The other controls I consider to be window dressing.  Let's take a closer look at the action control. 

When you click on the dropdown, you will see a series of actions that you can select.  Your popup menu will look like the screenshot below:


 Some of these actions are pretty obvious, so I won't waste my time explaining what Zoom In, or Save Record mean.  Ok, just in case, lets go thru some of these.  When the user presses the button, the following actions are performed for the following actions listed in the dropdown menu:

Zoom In - the form zooms in one level from current level
Zoom Out - the form zooms out one level from current level
New Record - a new blank record is created for the table associated with the form
Delete Record - the current record in the table is deleted
Print - invokes the printer to print the form
Print Preview - duh
Help - opens the help files, same as selecting Help>Adesso Help (F1) from the Adesso menus
Duplicate Record - creates an exact copy of the current record.  All field values are copied
Save Record - saves the current record to the database
Export Record - same as selecting Record>Export Record from the Adesso menu
E-mail Record - creates the form in HTML and invokes your email client
First Record - navigates to the first record in the table
Last Record - navigates to the last record in the table
Previous Record - navigates to the previous record in the table
Next Record - navigates to the next record in the table
Go to Tab - navigates to a specific tab on the form
Go to Field - navigates to a specific field on the form (regardless of what tab the field is on)
Go to URL - invokes your default web browser to navigate to a specific website
Run Plug-in - this is an important one: invokes a plugin to do something from the plugi-architecture section of Adesso, like print a Crystal Report, for example.
Read GPS - reads the GPS on the device...note: you need to specify the GPS port number in the Adesso Preferences
Copy Records - Copies records from the detail table to the parent table.  Same as checking the copy records checkbox in a o2o relationship
Run Script - in the parameters field below the action, you can specify multiple actions (like Save Record and Zoom In, for example)  Syntax of this script should be as follows:
Cancel - if I need to explain this one, then you shouldn't be building applications
New One-to-Many Record - creates a new many record as long as there is a 02m relationship
New One-to-Many Record Using Tags - same as the action above, but uses the Tag identifier to determine which view and form to use (useful if you have more than one form per table)
Mark Binary for Download - marks the current record for download of missing binary files.  Because you can define binaries to download on request (instead of always), you can use this action to do this for the current record
Unmark Binary for Download - opposite of the action above
Calculate Expression - this is an important one.  You can create a field, insert an expression into it, and then use this action to run that particular expression.  The expression can be anything...a calculation, for example.

I'm not going to show you each and every single action on this list...too much writing.  I will show you a few that are more complex than your typical Save Record action, but I will leave this for another section of this blog, or maybe the next blog (depending on the # of bottles of Guinness in the 'fridge).  Let's move to the other tab in the button designer.

Appearance Tab 

If you select 'Standard' from the Type dropdown in the Action tab, the 'Appearance' tab will look like the following screenshot:


If you instead select 'Image' from the Type dropdown in the Action tab, the 'Appearance' tab will look like the following screenshot...notice that there are slight differences...The height and width are displayed in pixels.  this is set up that way because we are using images instead of the standard rectangle for your button shape.


You will also see a preview of your button in the preview area on the bottom of the window. 

Disable on Click
There's an important feature on this screen...its called Disable on Click. It's usefulness comes into play if you want to do something when a user clicks on the button, but you then want to de-activate the button after it is clicked once.  To do this, simply click on the 'Disable on click' checkbox.  you can also specify a color for the button and the text after it clicks. 

Shape
Notice that there is a shape control in the center of the window.  If you selected 'Image' from the Type dropdown on the Action tab, then all the shapes from the ButtonPressed folder will appear in this dropdown list, enabling you to quickly change the button image.  This is handy if you are unsure of what shape you want to use.  The preview screen refreshes once you select something from that dropdown.  If you have a lot of button shape images, and you store them in that folder, they will always be available from this dropdown menu.  
 
On my next blog I will show you some real buttons, what they look like on an Adesso application, and what they actually do.

<>


Monday, January 11, 2010

Building a Mystery Shopper (Bathroom QA) Application

Pesto Garden, Inc. Bathroom QA Application

 Ok, lets get started building a fun application.  Let's say you were hired by Pesto Garden, one of the many Italian restaurant chains in the US.  Your boss, Mr. Pasta Lasagna, just read a news story about how the new White House administration thinks that technology can improve the healthcare industry via e-records and other neato things that high tech gadgets and computers can do.  Mr. Lasagna thinks that if it can work in healthcare, why not in restaurants?  So he tells you that you need to build a system to collect bathroom cleanliness data electronically so that he can quickly tell which of his restaurants are providing a clean bathroom experience to its customers.

So your new assignment is to develop a quality control program that helps improve the restaurant's bathrooms.  You decide that collecting this information in offline mode is the way to go because not all of Pesto Garden restaurants have internet access.  Besides, not having to rely on Pesto Garden's crappy and unreliable internet service, even when it is available, won't slow you down on your job.

Before you build your application, you first have to think about what sort of data you will be collecting and how to store it.  Think of it in terms of one-to-many relationships.  Each restaurant is a fixed location.  You will store information about each restaurant like its address, city, state, its capacity, when was it opened for the first time, etc.  Each restaurant most likely will have more than one bathroom, so you need to create a table to store bathroom information such as the the bathroom number, whether its a men's bathroom, women's bathroom, or unisex bathroom, the number of toilets, number of stalls, urinals, sinks, etc.  You then need to assume that your QA program will require that someone from your department will be visiting each restaurant more than once, maybe once every three months.  So the inspection information would be stored in a many table and would contain things like the inspection date, the inspector name, what the bathroom conditions were like, etc.  Another table you probably want to build would be an Inspector table.  Here you would store information about the inspector conducting the inspection...his name, contact info, and so forth.


STEP 1 - TABLES AND FIELDS

So lets launch Adesso and build four tables: 1) Restaurants; 2) Bathrooms; 3) Inspections; and 4) Inspectors.  We will build the easiest one first.  Restaurants.  Once you create your application and the Restaurant table, you will be presented with the following screen, which is where you create fields that become part of that table.


I am going to create a bunch of fields that should go in the Restaurant table.  Most will be plain text fields, some will be listboxes so that you can enter State in there, and some will be numerical type of fields.   A screenshot of the 'state' listbox is presented below.


For the 'State' field we are simply adding static text to the listbox for each state in the US.  I also added a photo field...to store a photo of the facility itself, maybe the entrance of the restaurant.  To create a binary field and assign it a display type of image, see the screenshot below.


Notice that you can set the binary image to download always, on request, on a condition, or not sync at all.  These options are there because remember that we are dealing with an offline database system that runs on small devices.  You have to be careful when designing your application as to what the target device(s) are going to be.  If you choose 'on request', the image will be uploaded to the server once the user syncs, but when someone else syncs to the database, only the header information will download from the server, sort of like email headers.  If that particular user wants to download the image, then he will have the option of marking the binary file for download upon next sync.

Ok, we have completed building the Restaurant table, your table editor should look like the screen below.


OOPS!  I just realized that we haven't even discussed the idea behind ensuring a unique identifier in each table.  Notice in the above image, there's a field called restaurant_name.  We can assume that this field is the one that would contain a unique value for each restaurant.  That means that the user cannot enter "Pesto Garden" into each record.  If he does, then how would one know Pesto Garden #10 from Pesto Garden #251 in the database?  One way to tackle this is to use a unique names or a unique restaurant ID number that was assigned by Pesto Garden in their accounting system.  However, this company is still in the dark ages and doesn't do that, so we have to figure out how to assign a unique value to each record on our own.  One way to do this is to create a "restaurant_no" text field and give it an expression of RECORDID().  This function uses a hexadecimal function to assign a unique value to the field.  Remember that this is an offline system, so there's no way to autoincrement the value without potentially causing conflicts with other users.  So let's go ahead and add a new field called restaurant_id_no and give it the RECORDID() function as an expression.


Now that we have a unique identifier in this table, we will go ahead and create the bathroom table.  I will create fields for bathroom type (mens, womens, or unisex), # of toilets, # of urinals, trash receptacles, etc.  Don't forget to also include a unique identifier for this table too.  My table looks like this:


Note that there is a restaurant_id_no field in the related bathroom table.  In order to connect the Restaurant table to the Bathroom table, all you need to do is create one single field in the Bathroom table that will act as the "connector" field to connect the two related tables.  I usually name the fields exactly the same in all the tables to make it easy to know that it is a "relationship" field.  Remember my prfevious blog post when I talked about relationships:  always think one to many.  In this case, one restaurant can have many bathrooms.  More about relationships later in this blog post.

Inspection Table
Our most important table for this application, the inspection table, is next.  This is the table that will store inspection information, which would include things like "are the toilets working, is the bathroom a filthy mess, do the stall doors close properly, is there obscene graffiti on the walls, etc.  Once built, your inspection table should look something like this:


Inspector Table
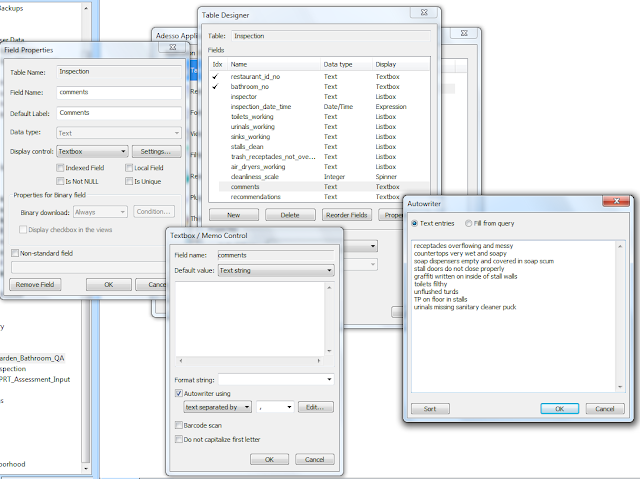
Our final table is the inspector table.  I included inspector name, city, state, cell phone, and email address in this table.  Once this table is built, I can go back to the Inspection table and use it as a lookup from the inspector field.  The lookup screen is accessed by double-clicking on the Inspection.inspector field and then clicking on the Settings button to the right of the display control type.  Once there, click on the Query radio button, select the Inspectors table from the lookup table dropdown menu, and then select the field you want to connect to.  Your screen will look like this:


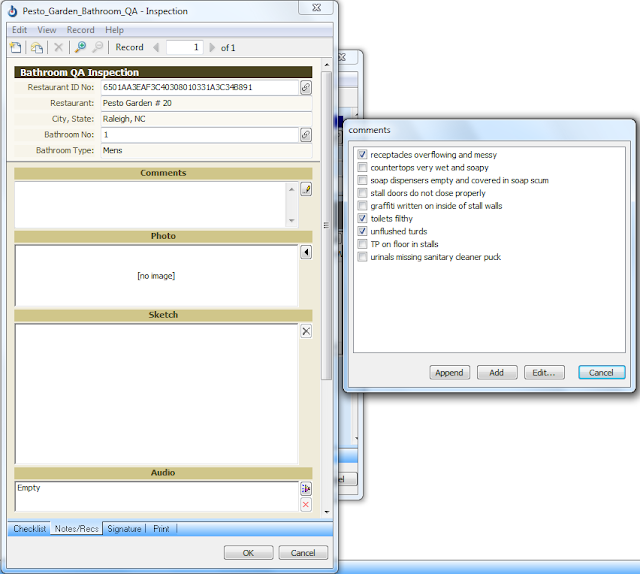
Notice that I have included both a comments and a recommendations field.  If you want to include an autowriter widget next to the field on the form, so that the user can simply select commonly-occurring things from a checkbox list, then all you need to do is click on the settings button next to the display type drowdown, select autowriter, and then click on the edit button.  Here you will have the ability to enter all the values you want to display from the autowriter widget.   See screenshot below:


 STEP 2 - RELATIONSHIPS

The very next step in building your bathroom QA application is to connect the tables to each other.  Remember to ALWAYS think one to many.  In our case here, each restaurant can have many bathrooms, and each bathroom can have many inspections.  By logical deduction, then each restaurant can also have many inspections.  And each inspector can also conduct many inspections.  If you understand this one concept, then you have what it takes to build a database application in Adesso. 

Building a Relationship Between Restaurant and Bathroom
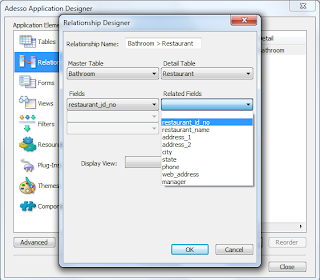
In the Adesso Designer, click on the Relationships icon on the left pane, and then click on the 'New" button on the bottom of the right pane.  You will be presented with the following window:


There are two types of relationships in Adesso: a one-to-many (O2M) and a one-to-one (O2O) relationship.  A O2M relationship is exactly what we described above, where, for example, one restaurant can have many bathrooms, and one bathroom can have many inspections.  In Adesso, a O2O relationship is exactly the opposite.  This concept may be difficult to understand, so for purposes of building good Adesso applications, all you really need to know about relationships is this: if you build a O2M relationship between two tables in Adesso, you need to build a O2O relationship in the exact opposite direction between those same two tables.  The reason for this is for allowing the many, or child, record to be able to display fields from the parent onto its form and its views.  More on this later.

The easiest way to start is to first build a O2M relationship, then build the opposite O2O.  Although you can use any naming convention you like, its good practice to follow something like this: Table1 > Table2.  That way you know which tables are related, and in which direction.  Notice that the icons are slightly different for the two available relationship types.  In or case here, name the relationship Restaurant > Bathroom and click ok.  Your screen will look like this:


Notice that there is a Master table and a Detail table.  This is the same thing as a one table and a many table.  The Master table = the one table, and the Detail table is the many table.  this is also referred as a Parent to Child relationship.  Parent = Master = One.  Child = Detail = many.

Now you can see why it is important to include a field in the many table that is the labeled the same in the one table...it makes it easier to connect them to build the relationship correctly.  You will also notice that there are three field dropdowns for each table.  This feature allows you to create uniqueness within the many table by narrowing down the list of records in the many table that will match up.  The more fields you use, the fewer records will match.  However, it is not absolutely necessary to use this if you are creating uniqueness in your application in another way, such as using the RECORDID() function.  In such a case, all you need to do is connect the tables by selecting the same field that is present in both tables. 


Enforce Referential Integrity - Very Powerful, and Very Dangerous
Notice that there is a checkbox called "Enforce Referential Integrity".  If this checkbox is checked, then this means that essentially you don't want to have any orphan records.  Think of it this way: if you delete a record from the one, or parent table, then all the related records from the many, or child, table will be deleted.  If you think of this in terms of humans, if you kill off a parent, then the database will kill off all of that parent's children automatically.  By default you should NOT have this checkbox checked unless you know what you are doing.  The reason for this is that once records are deleted, they are hard to recover, if at all.  If you make a mistake, and accidentally delete a parent record, then all the detail records are gone, period.  Sayonara.  I would prefer to have a bunch of orphan records around and then manually delete them later if they are not needed, than to programmatically have a system that deletes them for me.  Err on the side of caution, in my opinion.  'Nuff said about this.

Ok, once you create a O2M relationship, you need to create an exact opposite O2O relationship for the same tables.  Click on New, type in Bathroom > Restaurant, and click on the One to One icon.  Your screen will look like this:


Note that an O2O relationship contains a display view dropdown.  From here you would select the view that you want to display when a user clicks on a related field widget (more on this later).  Since we haven't built any views yet, you can leave this dropdown alone and come back to it once you build some views.

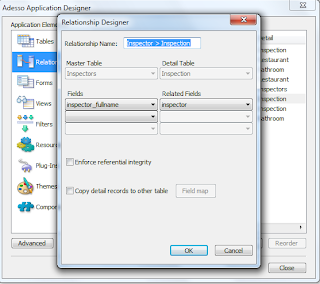
Now you will need to build O2M relationships between Restaurant > Inspection; Bathroom > Inspection, and Inspector > Inspection.  Then you will need to build O2O relationships in the exact opposite direction for these table pairs.  Your Bathroom > Inspection relationship  should look something like this:


 And your Inspector > Inspection relationship should look something like this:


Your main relationships designer screen should look like the following:


STEP 3 - FORMS

Now that you have connected the tables, we need to build forms for each table.  In Adesso, you can create an unlimited number of forms per table, and link different forms to different filtered views programmatically by using different events or conditions.  This gives you the ability to use the same table to store data, but navigate a user to a completely different form depending on where he is or what he is looking at in the database.  Very powerful.  For purposes of this simple application, we will focus on building only one form for each table. 

The Form Wizard
Adesso contains a form wizard that will automatically create an input form for you based on the fields in your table.  I encourage you to use it and then change the form manually once it has done its thing. 

To create a form, click on the Forms icon on the left pane of the Application Designer screen, then click on 'New' on the bottom of the right pane.  Before entering a name for the form, click on the Data Source dropdown and select a table.  In this case, select the Restaurant table.  Notice that Adesso will automatically name the form the same as the table name.  You can change the name manually, but for now, leave it as is.


Note that there are 3 form types: Data form, Home form, and Startup form.  Almost all your forms will be of type Data form.  The Home form is a special form that allows you to build dashboard-style screens for both PC and PPC. The Startup form is essentially a simple splash screen that displays at launch only.  It is typically used to display author information, version numbers, logos, etc.  For our bathroom qa app, we will stick to data forms only.

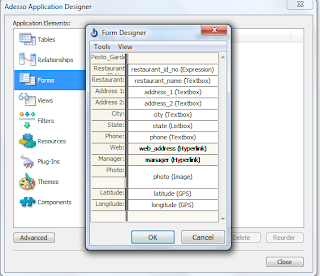
Once you click ok, the wizard will pop up a window asking if you would like Adesso to create the form based on your field definitions.  Click yes.  The initial form will look something like this:


In Adesso, you can place a maximum of two fields on a row.  While this is a limitation, keep in mind that the forms need to be readable on PPCs, hence the limitation.  Despite this limitation, you can still build very powerful and aesthetically pleasing forms in Adesso that provide a lot of flexibility.  I will show you how.

On the form in the example above, notice that there are labels on the left, and fields on the right.  They are separated from each other by a large vertical line.  This is a slider.  If you move the slider from left to right, you will give the labels more space while shrinking the space available for the fields.   These screen constraints are set so that the application designer can effectively build an app that can be viewed on a PPC.  If your target devices are PCs (and not PPCs), its ok.  Users can stretch the forms however they want in runtime.

On the top of the form you have two menus: Tools and View.  Most functionality is available from the Tools menu: validation conditions, form style, form properties, and tabs.  See screenshot below:


The validation conditions menu function allows you to set an unlimited number of validations that are checked when the user tries to save the record.  If a condition is not met, a popup is displayed with the error condition that the app designer enters for display.  All functions that are available within Adesso are also available in the validation conditions section of the form. 


The form style menu allows you to select a predefined style or create your own custom style.


The form properties menu allows you to set the default size of the window on a PC, the total height of the form (maximum = 100 rows), select a background image, and basic form background colors.


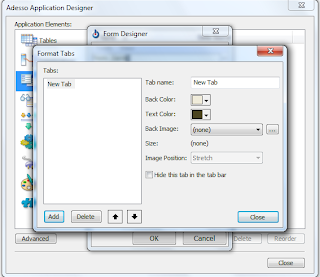
The tabs menu is where you create tabs for the form, and in what order they will appear on the form from left to right.  You can also hide tabs if you want to force the app user to navigate to tabs using button controls, for example.


Form Designer Controls & Tips
  • To drop a field into a row, simply click on a blank row and a popup will appear where you can then select a field from that table or its related one tables, where you have created O2O relationships.   
  • To move a field from one row to another, click and hold onto the field, drag with your mouse until the field is in the row you want, and let go of your mouse button. 
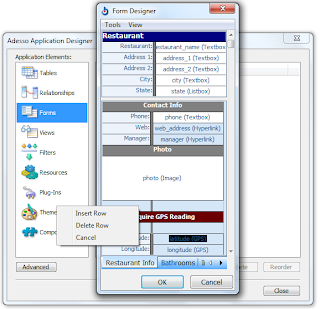
  • To add a new blank row to a form, right-click where you want to add the row, and a popup menu will appear with Insert Row, Delete Row and Cancel options.
  • To strip a label from a row, click on the label, and select remove label. 
  • To remove both a field and its label, click on the field, and select remove field.  The label will be deleted along with the field.
  • To add a static label, click on an empty field and select static label from the popup.  Then format it using the format tools available from the label designer.
  • To add a parent field, click on an empty field and select the parent table, then the field in that table.
  • To add a O2M grid, click on an empty field and select the relationship you want.
I went ahead and formatted the Restaurant table somewhat.  Screenshot is provided below.


 We will go over some of the form items now:
  • When you create tabs, a section at the top of the form is then split by a horizontal line.  this horizontal line signifies that everything above that line will display on each form, while everything below the line will display only on the respective form.  To move the line up and down, simply drag it up or down.  Please note that in order to move the line, the form has to be large enough in height (Tools>Format>Form Properties) and/or have enough blank spaces.  
  • The header area contains its own vertical slider that acts independently of the vertical slider in the section that is specific to the tab you are editing.
  • Static text and fields can be formatted to spread across the full row, and can also be changed to be more than one row in height.  
  • Notice that the photo field is several rows high and covers full row.
  • you can add buttons to perform specific tasks.  Notice the Acquire GPS Reading button.
  • Fields can be formatted to be in read-only mode, so that a user cannot enter anything in the field.
  • Tabs can be rearranged to be in a different order from Tools>Format>Tabs menu.
When you click into a blank field, your screen will look something like this:


If you right-click into a blank field, the popup will instead look like this:


 If you select a button control to place in a blank field, the button designer will look like this:


Notice that with buttons, you can do all sorts of stuff.  In our case, we want to read the GPS on the PPC, so we select an action of Read GPS.

Now take a look at the second tab I created for the Restaurant form.


The control I placed below the static text is a O2M control which displays the related many records.  To load this control onto the form, simply click into a blank row, and select 'Restaurant > Bathroom' from the popup menu.  O2M grid controls are labeled with the same names that you created them in on the Relationships designer.  Once you drop a O2M grid control onto the form, you can then click on them to change its design.  Screenshot of this is displayed below:


Of key importance is the display view.  We haven't created any views yet, but you will want to later go back into this control and select one from the dropdown menu.  This allows you to fully control what displays in that grid view from within that form.  Very powerful feature.

Once you have created all your forms, you can then proceed to creating your views.


STEP 4 - VIEWS

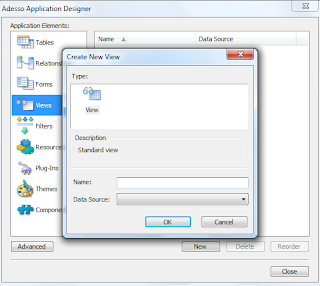
Building views is relatively straightforward.  To get started, click on the views icon on the left pane of the Application Designer.  Click on the 'new' button on the bottom of the right pane to create a new view.  The following screen will display:


enter a name and a data source.  The data source is simply the table.  Same thing.  A note on views:
  • Views are merely sorting and grouping views of the records stored in the table
  • You can create an infinite number of views and display them in whatever order you want
  • You can hide views if you don't want them to display on the main Adesso screen
  • You can add filters to views to display only records that meet specific critiera
  • You can navigate to specific input forms from a view
  • Views can take whatever name you assign it...I like to name a view by the sort order...for example, if the view sorts and groups the records by rtheir date, then I would label the view by Date
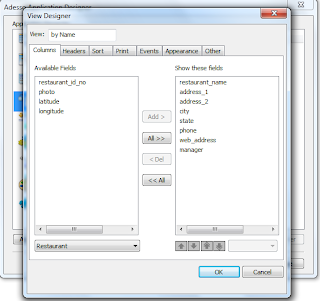
When you create a view, you will be presented with the following screen:


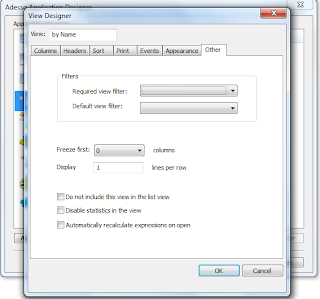
I pushed several fields into the right hand side of the screen, then made sure the field labels/headers made sense and were justified correctly.  Then I clicked on the sort tab and told it to sort by restaurant_name field.  Screenshots of these tabs are listed below:


STEP 5 - TESTING YOUR APPLICATION

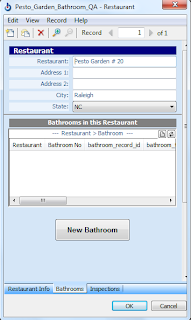
Once you create a few views for each table, you are ready to test your application.  The following is a screenshot of the restaurant table and form while entering our first restaurant record:


Once we enter a restaurant record, then we can enter a bathroom that is inside the restaurant.  To do that, navigate to the bathroom tab on the same form and click on the button.


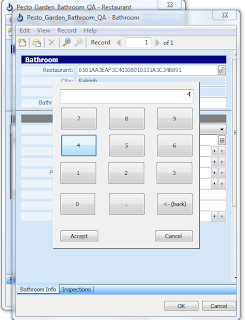
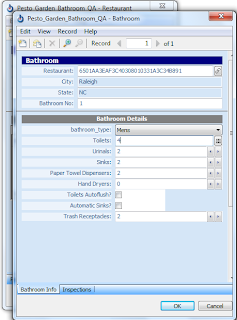
Bathroom records created from this form will associate with its parent and show up in the O2M grid box in the screenshot above.   the following screenshot is the view you will see when entering a new bathroom record.  Note that I have used two different types of input widgets for numerical values:  a spinner, denoted with two arrows < > .  Click on the right arrow to increase the number, and click on the left arrow to decrease the number.  The other type of widget available for numbers is a numerical keypad, as illustrated below:


After taking the screenshot, I notieced a mistake on the display type for the yes/no fields on this form.  I changed the yes/no field sfrom display type of text to checkbox.  Screenshot is displayed below:


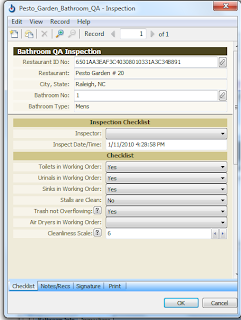
Once you enter a record for restaurant and a record for bathroom, you are ready to test the inspection table.  To test, click on the Inspections tab and click the button to enter a new inspection record.


You will notice that the Inspector field doesn't have any values in it.  This doesn't mean that that field is messed up...it is because we haven't actually created any records for the Inspector table.  We can add records for that table later.  Now let's click on the Notes tab:


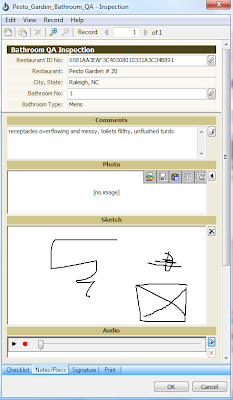
Notice that there's an autowriter widget to the right of the comments field.  It is populated with the autowriter items we created when designing the Inspection table and fields.  you can check boxes off in the autowriter, and then edit them within the comments field later.  Fully editable comments.  The photo field allows you to select a photo from your hard drive, and it also can drive an integrated camera on a PPC device directly.  The sketch field is simply a doodle field.  The audiro field allows you to record an audio clip as long as your device has a microphone.


Final Comments

While there are clearly some things that need to be fixed up, jazzed up, and tweaked/improved for this application, it is essentially ready to go.  Learning Adesso is really easy and straightforward.  Next blog will focus on improving this particular application, such as improving some button controls, moving things around, etc.  I will also then show you how to upload this application to the Adesso Server and make it available to others for their use.